I am sometimes asked “what saw should I get?” There is no simple answer to that question other than it depends. It kind of reminds me of high school days: “My Chevy truck is better than your Ford truck!” We will not even talk about Dodges. Friends don’t let friends drive a Dodge! The same thing can apply to scroll saws.
I have often thought about writing a blog article on my personal experiences with scroll saws and am finally going to do it! I am not an expert, I have not written books, and people do not talk about me at scroll saw conventions (do they still do those?). My experiences over several decades are my own as a hobbyist and now very part time commercial cutter. They may differ from someone else’s.
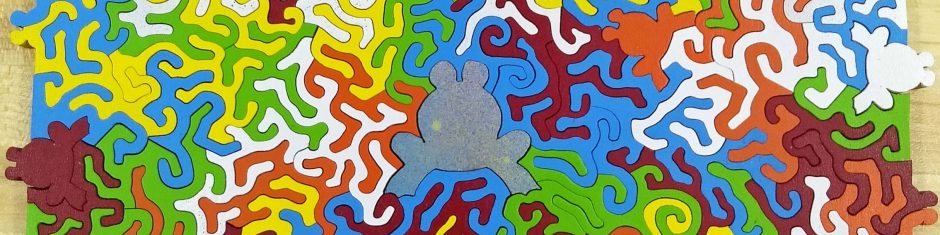
This will be a series of articles just to keep the length somewhat manageable. I will eventually cut three of the same puzzle using each of the three machines I personally own or have access to.
But first, I will review a little bit of basic information on scroll saws for the new cutter looking for a saw. Some of this will be to create a basis for some of my comments as I review my three saws. There are a lot of books on the subject along with some great websites maintained by well-known people. I am not going to attempt to duplicate all that information here. A good example of a book is “Scroll Saw Handbook” by Patrick Spielman. Mine was written in 1986, so some of the information is a little dated. I believe he released a new edition in the early 2000’s that is still probably missing new information from the last 20 years. A good example of a website is one that was created by Rick Hutcheson: Rick’s Scrollsaw (scrollsaws.com). It also appears to not have been updated in a few years. He appears to have some strong opinions, but he often posts counterpoints to his opinions submitted by others. It is kind of fun reading through some of it. There is at least one magazine dedicated to the scrolling craft: Scroll Saw Woodworking & Crafts – Everything for the scroll saw enthusiast, from tips and techniques and tool reviews to patterns and instructions for amazing projects including fretwork, intarsia, portraits, puzzles, and much more! (scrollsawer.com). This is a great magazine for more normal scrolling interests. I subscribed for a number of years, but as with many magazines, it started to become repetitive to me, and I dropped it. If you are new to the scroll saw, you may want to check it out for other ideas to try besides puzzles. Three-dimensional Christmas tree ornaments are kind of fun, as long as you do not pick a hard wood like hickory to start with!
As a related aside, you can learn how scroll saw blades are made here: How Scroll Saw Blades Are Made | Flying Dutchman – Mike’s Workshop | Flying Dutchman Scroll Saw Blades (mikesworkshop.com)
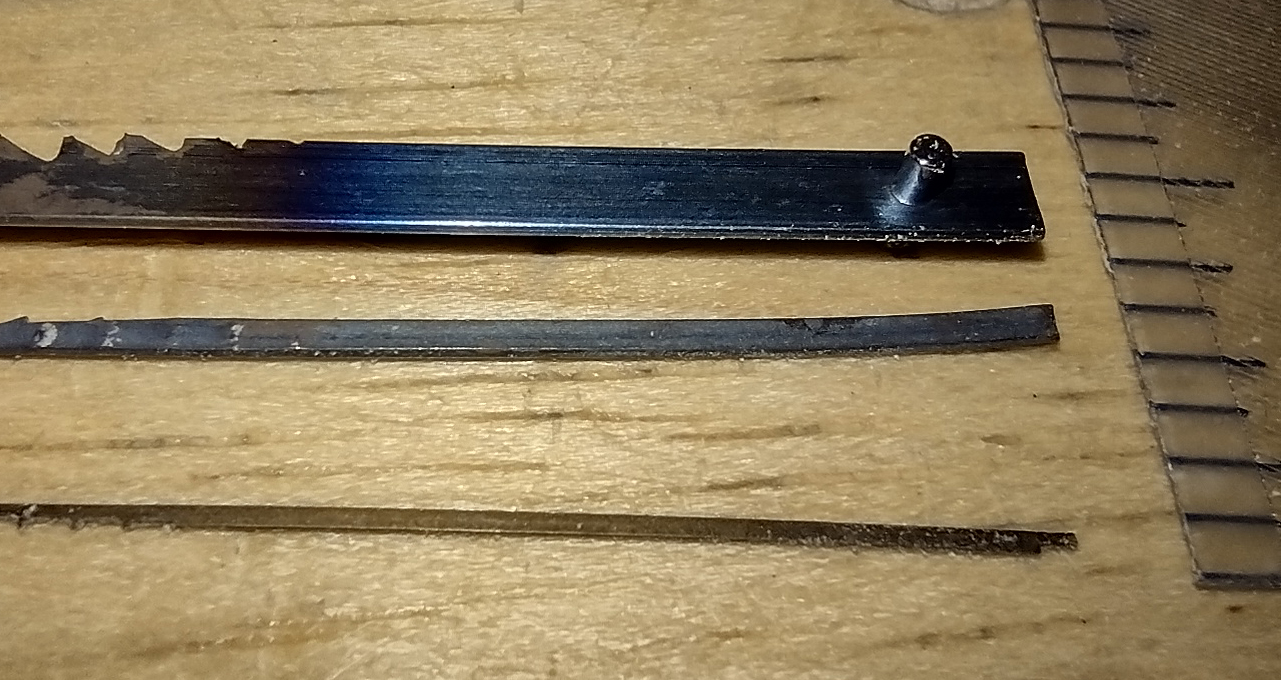
The first thing I want to comment on are the two basic types of blades. These are pinned blades and unpinned blades. The type of blade you use depends on the machine you have. Most serious scrollers are using unpinned blades. Not that you cannot make good cuts with pinned blades. Pinned blades have a positive in that they are easy to install in the saw. Everything else is a negative, from my viewpoint. The first negative is that they cannot be obtained in small enough sizes for the puzzle work I do. Here is a picture comparing a pinned blade to unpinned blades. The smallest of these is what I use to cut puzzles. I do not actually have any pinned scroll saw blades as I do not have a saw that would take them. This one is for my hand-held coping saws, but you can see what a pinned blade looks like. Notice the plastic rule on the right side. The graduations are 1/16″, so you can see the relative sizes well.
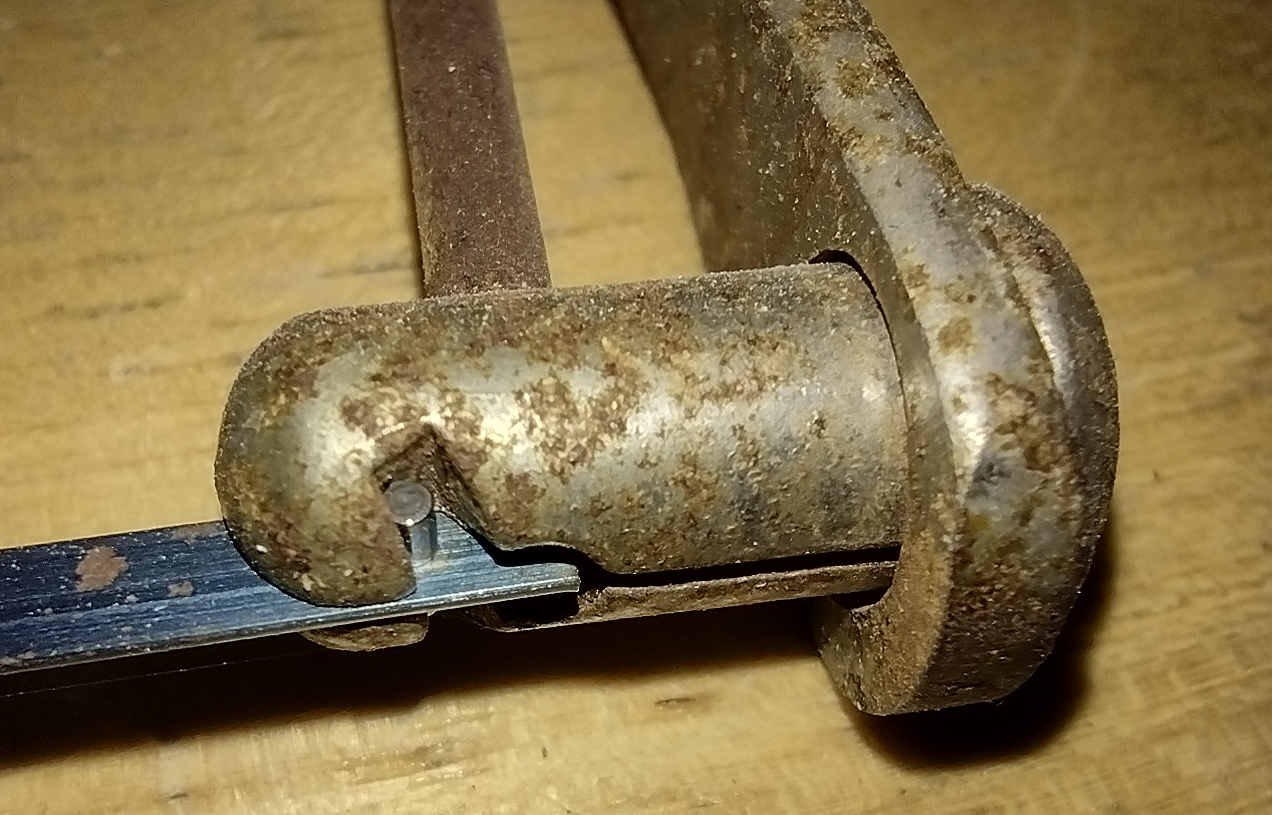
The pins go in slots in the blade holders. Quick and simple to install the blade. Once installed, they stay in place. See the picture below. This is on a coping saw, but a scroll saw taking pinned blades is not much different.
The second negative with pinned blades is that they are difficult to work with if you do any fretwork. With fretwork, you have a pattern that you are going to cut out to leave silhouettes behind. You drill a number of very small holes in the wood to thread the blade through to make these cuts. A pinned blade requires a larger hole, which would preclude many of the popular fretwork patterns out there. The picture below is a very simple piece, but pinned blades would not have worked.
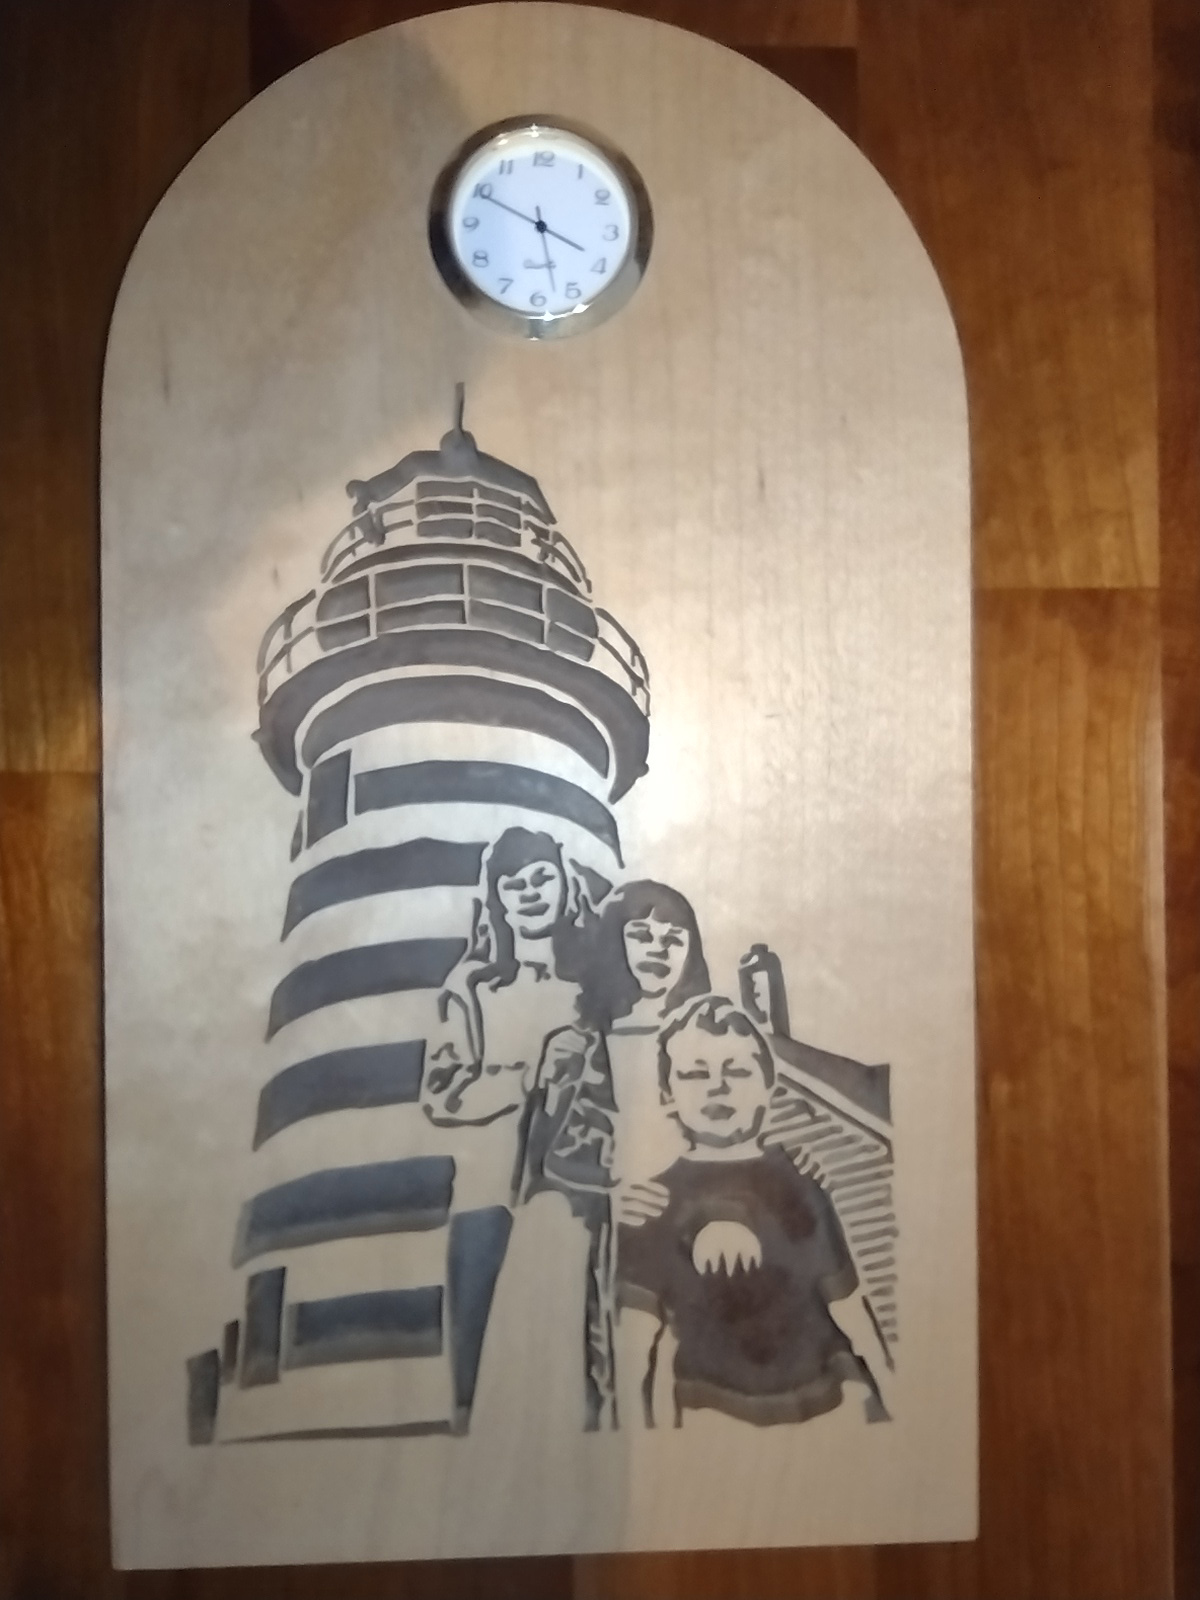
And yet another example of a project where pinned blades would not have worked for certain areas. This was cut in 3/4″ thick maple with a piece of Masonite as a dark backer for contrast. This was based on a photograph of our kids taken while on vacation in eastern Maine. I made a large one for my wife, and two smaller ones for my mother and mother-in-law. I also made a number of jigsaw puzzles based on this same photograph.
Now to talk about the saws cutting action. There are four basic types: rigid arm, parallel arm, C-arm, and parallel link.
Rigid arm. With this type of saw, the cutting action is strictly straight up and down, which is great! However, the motive force comes from below the table. The mechanism moves the blade up and down. Above the table, there is a spring return cylinder. On the down stroke, the blade is pulled down against the spring pressure. On the up stroke, the spring is pulling the slack blade back up as the lower mechanism pushes the blade up. This works pretty well for larger stiffer blades, but not so well for the smaller ones. When the blade drags in the tight saw kerf, the mechanism from below keeps pushing and can fold the skinny blade and break it. I had a version of one of these from the 1950’s that had a Craftsman label on it, but was made by Atlas, I think. It was one of two of my first scroll saws. I bought the two saws as a package deal at a yard sale. I cleaned up and fixed this Craftsman saw as much as possible, but I could never get it to work well with small blades. This was 25 – 30 years ago, so my memory is fuzzy on this. It may have required pinned blades. It either had the pinned blades and I could not find small blades for it, or it had blade clamps and kept breaking the 2/0 blades. This is actually what I started scrolling with years before cutting puzzles, i.e., fretwork, intarsia, etc. (The other saw was a little light duty benchtop model that took short 3″ pinned blades. It walked across the bench whenever you turned it on. I gave it to my mother-in-law, and she loved it! Best son-in-law ever!)
The straight up and down sawing action is the best for very accurate and detailed cutting. Also, these saws do not have a lot of moving parts, so there is less vibration due to less inertia changing. Being made entirely of cast iron and weighing more than a boat anchor helped cut the vibrations as well!
There was another version of a rigid arm saw that was developed by a fellow by the name of Ernie Mellon. The saw was called an Eclipse saw. He had a belt mechanism that traveled up through the rigid arm and drove two cam shaped mechanisms at either end. This maintained a constant tension on the blade. These were very sought after with a long waiting list to buy one. Unfortunately, he passed away and the business/manufacturing went with him. I believe only a little over 500 of these were ever made. The owners of these machines are now struggling to find parts to keep them running. If you go to Rick Hutcheson’s website, he has a writeup and good pictures of this saw. Someone has made a wooden version of this type of machine you can see here: www.youtube.com/watch?v=HfY24cqG8Y8. Skip down through the detail pictures until you get to the video.
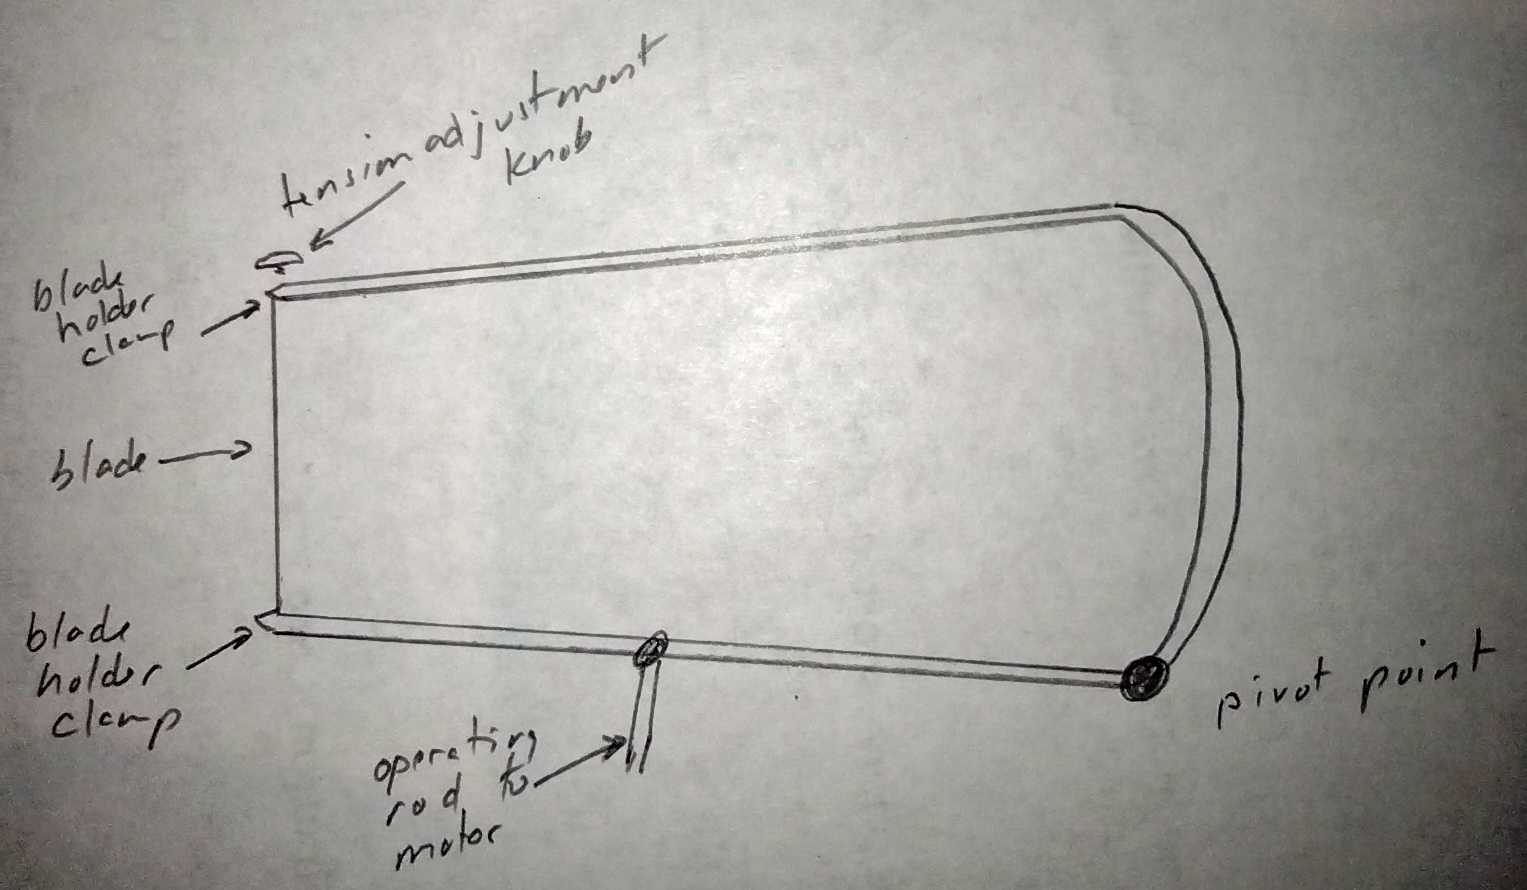
Constant tension parallel arm. This is one of the more common types of sawing action you will find. This type of mechanism has been around for quite a while. There are many wooden antique saws as well as newly manufactured saws that use this cutting motion. The advantage to this design is the geometry of a parallelogram. If you take a box and open the ends, as you collapse the box, the sides all remain parallel. In the first drawing below, you can see the key elements of the saw design.
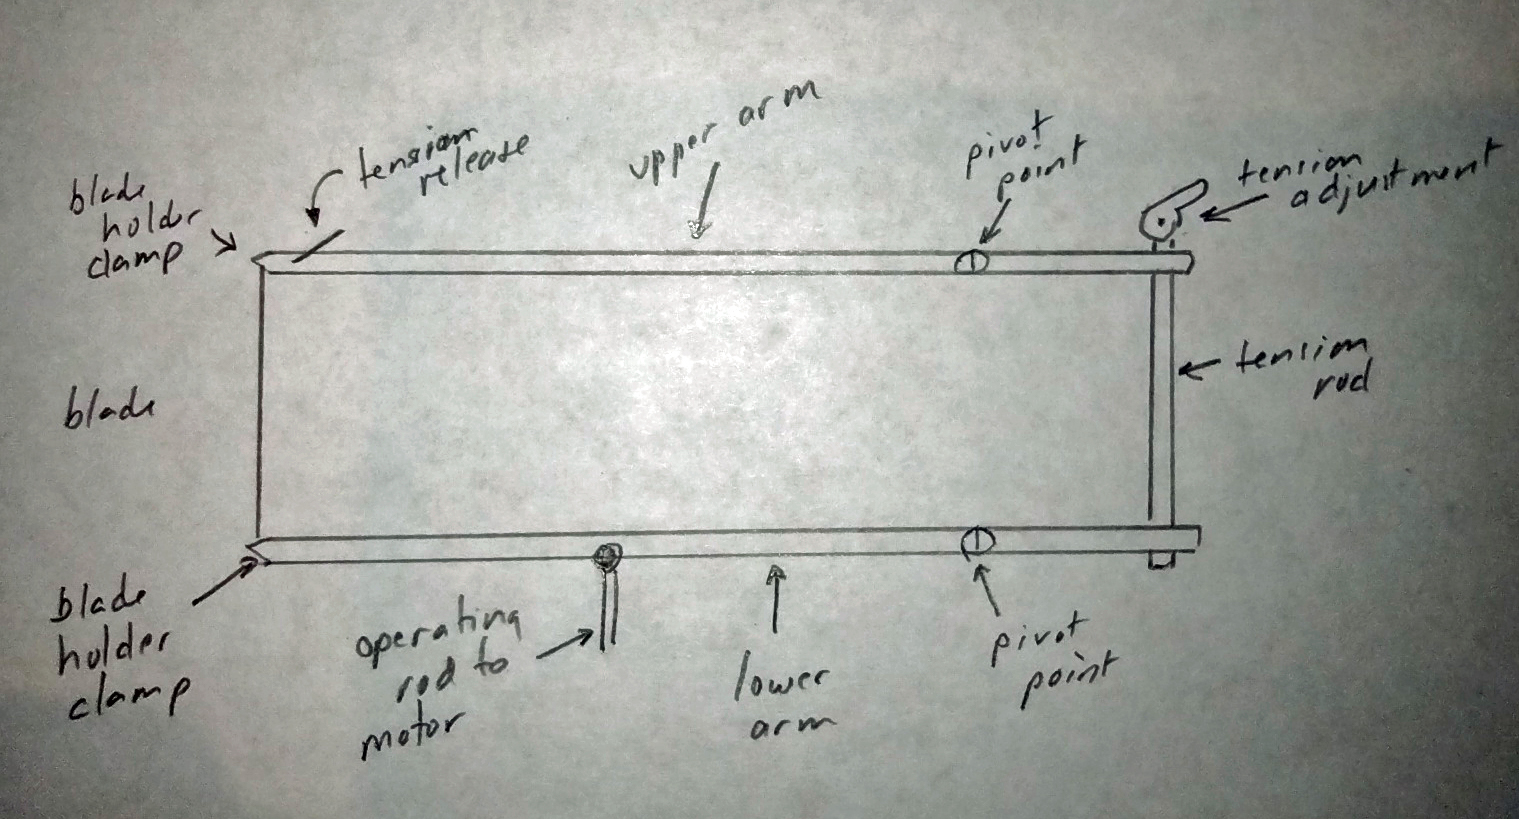
You can see the upper arm and the lower arm. They are each supported by their own pivot point. On the left side of the drawing, you see blade being held vertically by the upper and lower blade clamps. On the right side, you can see the tension rod. Those four components make up the parallelogram. Additionally, you see on the upper right a tension adjustment knob, and on the bottom arm an operating rod. The tension adjustment knob is usually at the back of the saw and is generally adjusted based on the size of blade installed. Once the tension is set, you operate the tension release lever to release the tension to change the blade, and then reinstate the tension when done.
As the saw operates, the operating rod pushes up on the lower arm, which pivots around the pivot point and makes the other end of the arm go down. That pulls down on the tension rod, which pulls down the back of the upper arm, which pivots around the pivot point and makes the other end of the upper arm go up. The opposite “surfaces” remain parallel to each other, but the shape changes from the specific shape of a rectangular parallelogram to the squished shape of a generic parallelogram. See the drawing below.

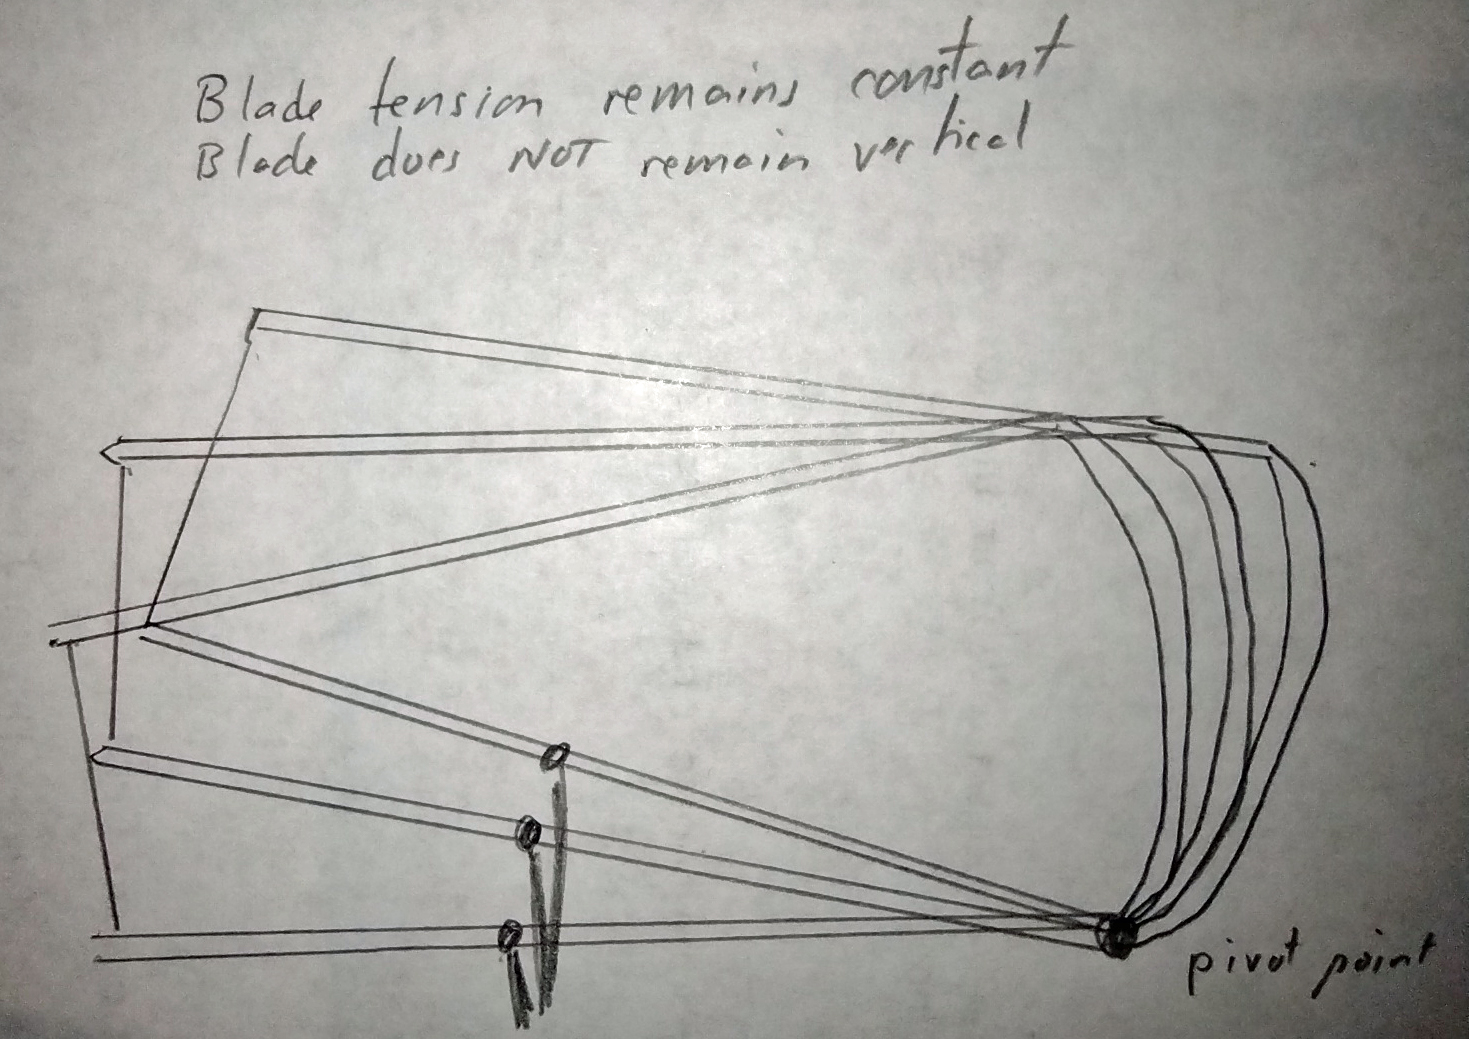
The other thing that happens is that the blade moves backward as it moves up. Then, on the downstroke, the blade moves forward as it comes down. This is actually the cutting portion of the stroke. If you continue this out, if the operating rod continues to pull down, the blade will again move backward as the arms move through an arc. The “sweet spot” is where the blade is all the way forward and may be about where the cutting table height is designed to be. You do need to realize that the amount of motion is exaggerated for the purposes of the drawing. I will discuss this more when I talk about the specific saws I will be using.
One negative, if you will, of this is the constantly changing motion of the arms. This can lead to vibration. Manufactures do all kinds of things to reduce the vibration, but inertia changing direction causes vibration.
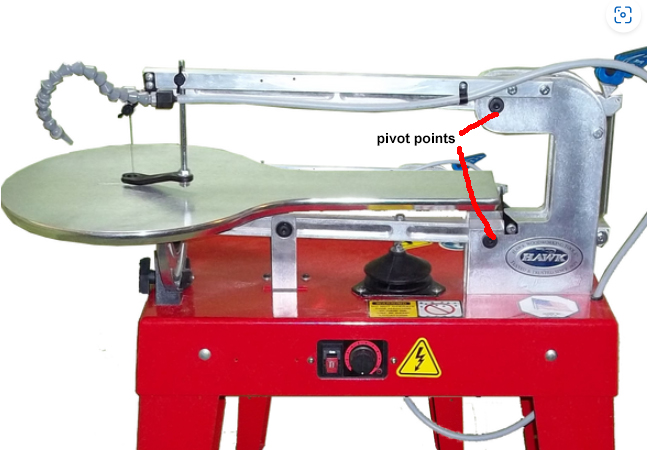
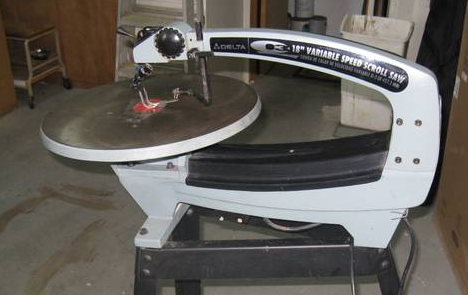
To show you a picture of an actual saw, here is a Hawk picture from the Bushton website. You can clearly see the pivot points, the tension rod and adjustment, the blade, and the upper blade clamp. The black blob in the middle attached to the lower arm is a diaphragm that generates a little air pressure to create a source of air to blow saw dust out of your view.
C-arm. I have not researched if anyone is currently making a C-arm saw. They were popular for a while due to their aggressive cutting ability. I have never owned or used one. These are also a constant tension saw. In this style of saw, the upper and lower arms are one casting. See the below drawing.
The upper and lower arms are one piece (and hopefully a little bit beefier than my drawing!). There is only one pivot point. As the operating rod moves up and down, the “C” assembly pivots around the pivot point. See below drawing.
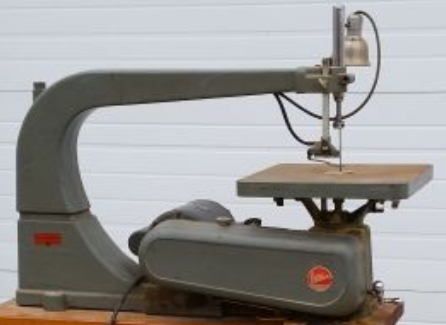
As you can see, the blade varies from a back tilt to a forward tilt. Once again, this is exaggerated for the purposes of demonstration. But this made many people decide they do not want a saw like this. They felt it would make for inaccurate cutting. Those who have one seem to like them. Not having used one, I have no opinion. Rick Hutcheson was a huge fan of the Delta Q3, and he made wooden clock gears using one. If cutting a clock gear is not precision work, then I am not sure what is! Here is a poor picture of a Delta Q3 from a for sale ad on the internet.
Parallel link. This is kind of the new kid on the block, I suppose, but it has been around for decades. It is once again based on the principle of a parallelogram, but it has a twist to it. Oh, and a whole lot more moving parts and pivot points. See the drawing below.
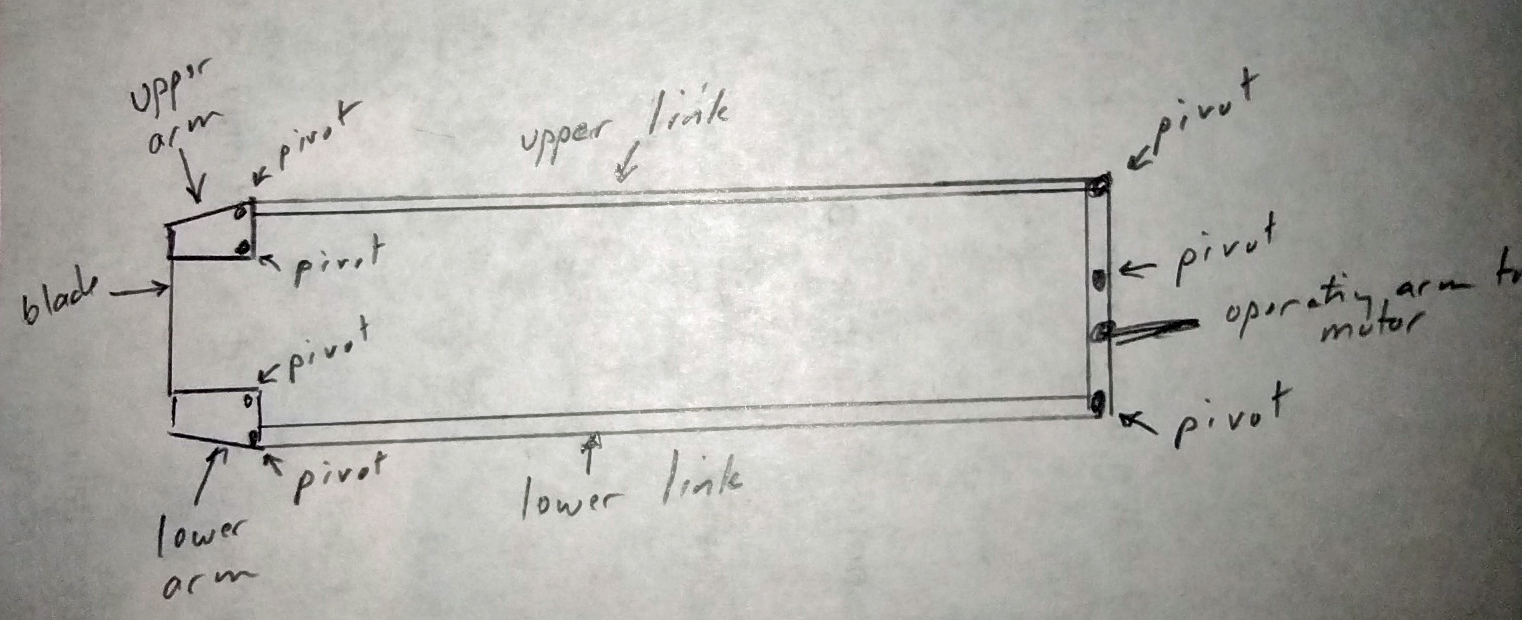
If you look to the left, you see the upper and lower arms. They are very short. The upper and lower links extend from the arms to the back of the saw. They only move horizontally, i.e. left and right in my drawing. There is another arm to the right that is moved by the motor assembly and causes the links to move back and forth. Moving those links causes the arms to move about their pivot points, thereby moving the blade up and down. See the really poor drawing below.
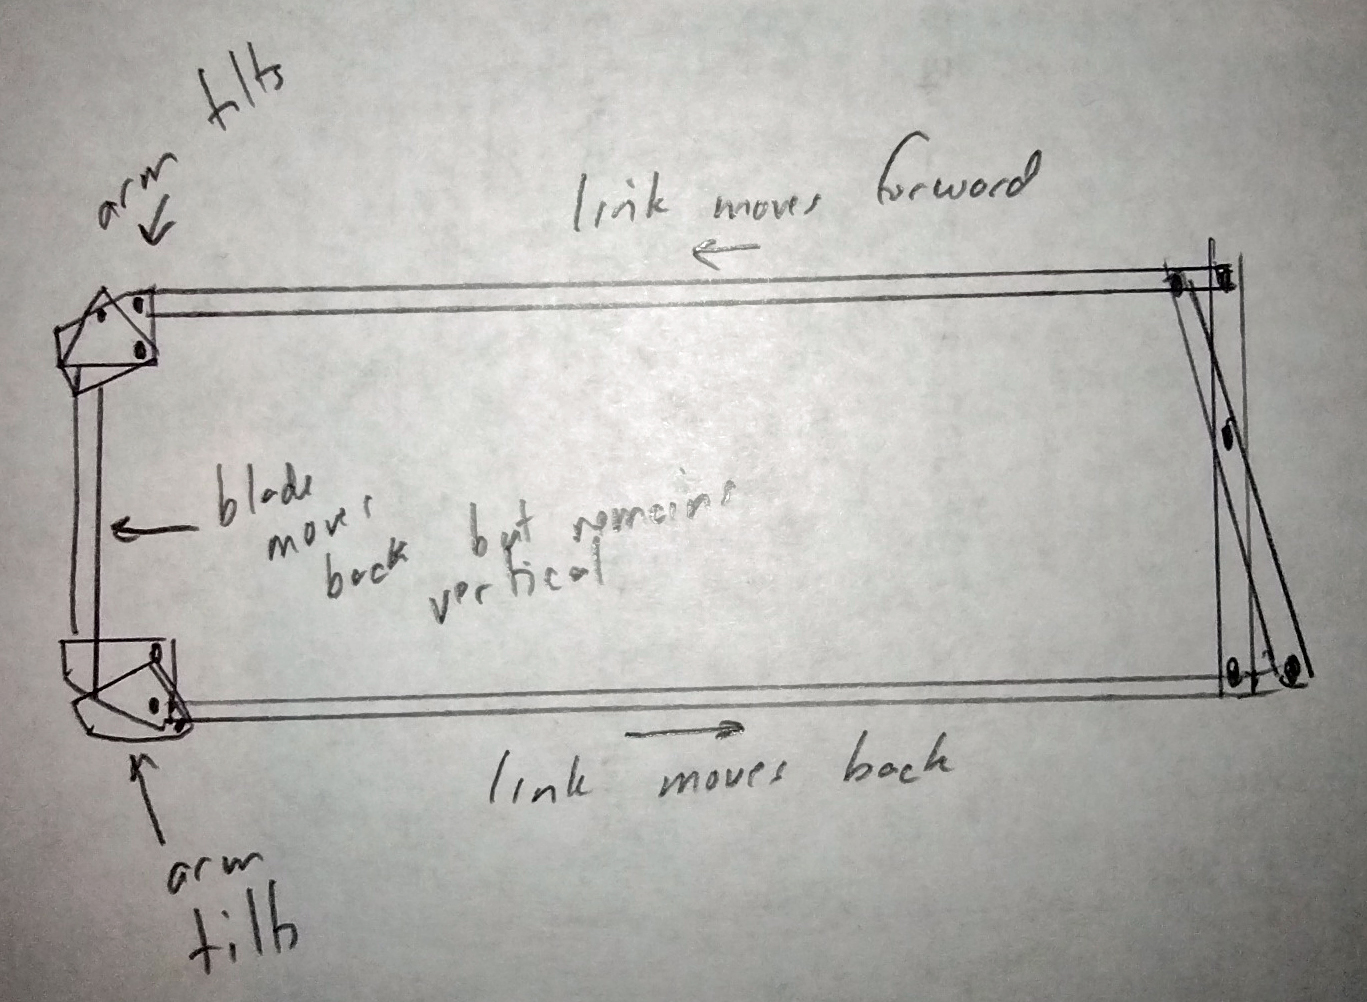
This has become a very common mechanism, it seems. It is used in the very common DeWalt saws and a number of others. It supposedly causes less vibration. However, to get the same amount of up and down blade stroke, the pivoting arms have to move through a larger angular change, which also results in more blade movement fore and aft. Some people do not care for this if they are doing precision work and would prefer the parallel arm style of mechanism.
This concludes this much longer than I wanted it to be blog entry. My next entry will be information about the three specific saws I am using. The third entry will be about the cutting experience I have as I cut three more Dragon Tail puzzles using those saws.
Happy Puzzling,
Bob