Before I start, a couple of comments on the last post. #1 – if you have a scroll saw with pinned blades, I was not trying to run it down. I was pointing out issues with pinned blades for those who are looking at buying their first saw so they can maybe make a better-informed decision BEFORE they buy one. #2 – I mentioned a constant tension rigid arm saw called the Eclipse. There were not very many made before the company closed its doors. If you look at this news clip, you can see where a number of them went: www.wcvb.com/article/norwich-vermont-puzzling-and-perplexing/10286694 . If you go to about 1:45 in the video and pause it, you can see a lineup of at least four of them at the Staves workshop! If they have four, they probably have more. That tells you something about the desirability of these saws for the quality of the work they turn out. And, they are being heavily used in a commercial shop, so they must have good durability.
For this blog post, I am going to discuss the basic characteristics of the three saws I have and one I once had. These saws are a Sears Rigid Arm Saw, a Shopsmith (20″), a DeWalt (20″), and a Hawk (26″). At the end of the post is a comparison table that lists the specifications side by side.
Sears Rigid Arm Saw – I no longer have this saw and it did not get used to cut a puzzle for this blog. I thought some comments would be useful, though.
The saw was heavy. It was made of cast iron, which I kind of liked. The table was small, maybe 10″ by 10″. It did NOT use pinned blades. I remembered this morning that it had blade clamps that were tightened with a hex head allen wrench. I had a tether on the allen wrench so it would not get lost and it hung down below the table until I needed it. For the most part, it worked really well using the larger sizes of scroll saw blades. The stand it was on was home made out of pine 2×4’s, which was not ideal. The only real problems came up when I started getting interested in cutting puzzles and tried using the smaller puzzle blades. Mine might have been deficient as compared to some others, but maybe not. There is a reason the “constant tension” aspect of the other saw mechanisms is emphasized.
Because of the spring return and subsequent variable tension, you cannot run these saws at a high speed. So, they go straight up and down, and cut slowly. There probably is not a better combination for doing very detailed and accurate cutting, or for learning how to use the saw. Speaking of speed, mine had a belt with 3 or 4 position pulleys to vary the speed. Some others I have seen have a mechanism with a crank to vary the speed with.
An interesting feature of many of this type of saw is that the rigid arm can be removed, and a stiff sabre saw blade mounted in the lower blade clamp. You now have a table with a saw blade sticking up out of it and you can cut as big of a piece of wood as you and your helpers can handle. I knew a fellow that did this and cut up some sheets of plywood into those large Christmas yard decorations that are profiles of a bunch of reindeer with Santa. The wife and kids helped him paint them as a family project. Personally, I would have gone and bought a handheld jigsaw (aka sabre saw). It is a lot easier (and safer) to handle and spin around a handheld saw to cut reindeer antlers than to manipulate a 4′ x 8′ sheet of plywood. But to each their own.
I often see Rockwood-Delta rigid arm scroll saws listed on Craigslist fairly inexpensively. I just checked my local listings, and there are three of them that pop up. One looks like a rusty piece of junk, the other two might be in good shape. If you are starting out and do not have a bunch of money to throw at a saw, you might want to go check out something similar to one of these. If it works well and is cheap enough (under $150 maybe), it may be a great starter saw. Just be aware, it may not work well for cutting puzzles. Go to your local store and buy some 2/0 size scroll saw blades. Take them and a small piece of 1/4″ plywood with you and ask to run the saw. Install your new blade and try to cut some puzzle pieces. If you cannot get it to work without breaking blades, or if they will not let you test it, walk away. (This applies to any used scroll saw you buy. I have done this with my last two. I got some funny looks, but why buy something that does not work?) You would probably need to be a little mechanically inclined if you are buying an older saw like that. If I did not have a saw and not much money to buy a better saw, I think I would rather work with one of these in good working order than a new one of the inexpensive light duty benchtop models sold through places like Harbor Freight and the like. Neither option is particularly desirable, in my opinion, but we do what we can with what we have.
Shopsmith scroll saw attachment.

The basic Shopsmith is a five-in-one tool that includes a lathe, table saw, drill press, 12″ sanding disc, and a horizontal boring tool. You can buy additional attachments that can be powered by the same motor (headstock) using a connector piece. The available attachments for purchase have at various times included a jointer, a planer, a belt sander, a strip sander, an air compressor, a paint sprayer, a grinding wheel, a bandsaw, a biscuit cutter, router collets, sanding drums, and, yes, a scroll saw. And, before the constant tension parallel arm scroll saw, there was a rigid arm scroll saw.
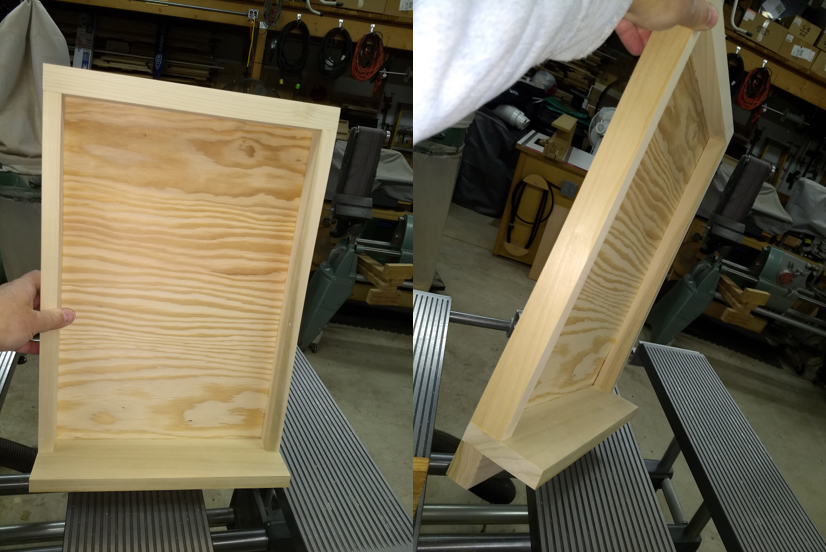
These do not get much respect outside of the adherents of the system. Because I was in the Navy and moving a lot, I could not acquire a lot of woodworking tools. I would have loved a big Powermatic table saw and a sanding station and …. . Fill in the dream shop tools of choice. We moved 13 times in 20 years, and only had so much weight allowance the Navy would pay to move. I bought into the Shopsmith paradigm and have never really regretted it. I have made a couple of poster beds, quilt racks, and lots of other stuff using mine. I took up bowl and pen turning for a while but never really did enough to be good at it. Two winters ago, I had a contract to make 50+ small bulletin boards for a senior living facility. The Shopsmith works great for many woodworking chores. I currently have two Shopsmith’s of different vintages. In the picture below, I am holding a bulletin board on one that is set up as a table saw, and in the background you can see a green one that is set up with the belt sander mounted on it.
I was not specifically looking for a Shopsmith scroll saw attachment, but I was looking for a used scroll saw to supplement or replace the Sears rigid arm saw. I really wanted to cut puzzles and the Craftsman rigid arm saw wasn’t cutting it. This was before Craigslist was a thing, so I was perusing the recent weekly Uncle Henry’s booklet (a revered Maine fixture similar to the Nickel Nick or Thrifty Nickel found everywhere else I have lived) and found a listing for a Shopsmith scroll saw attachment. “Oh, wow! Perfect!” I called and the fellow still had it and would I pleeaaassseee come look at it. It had been listed for a couple of months, and his wife was eager for it to be gone. It sounded like a ripe opportunity for me and my wallet! I verified it was one of the newer style parallel arm saws and not the old-style rigid arm saw and off I went.
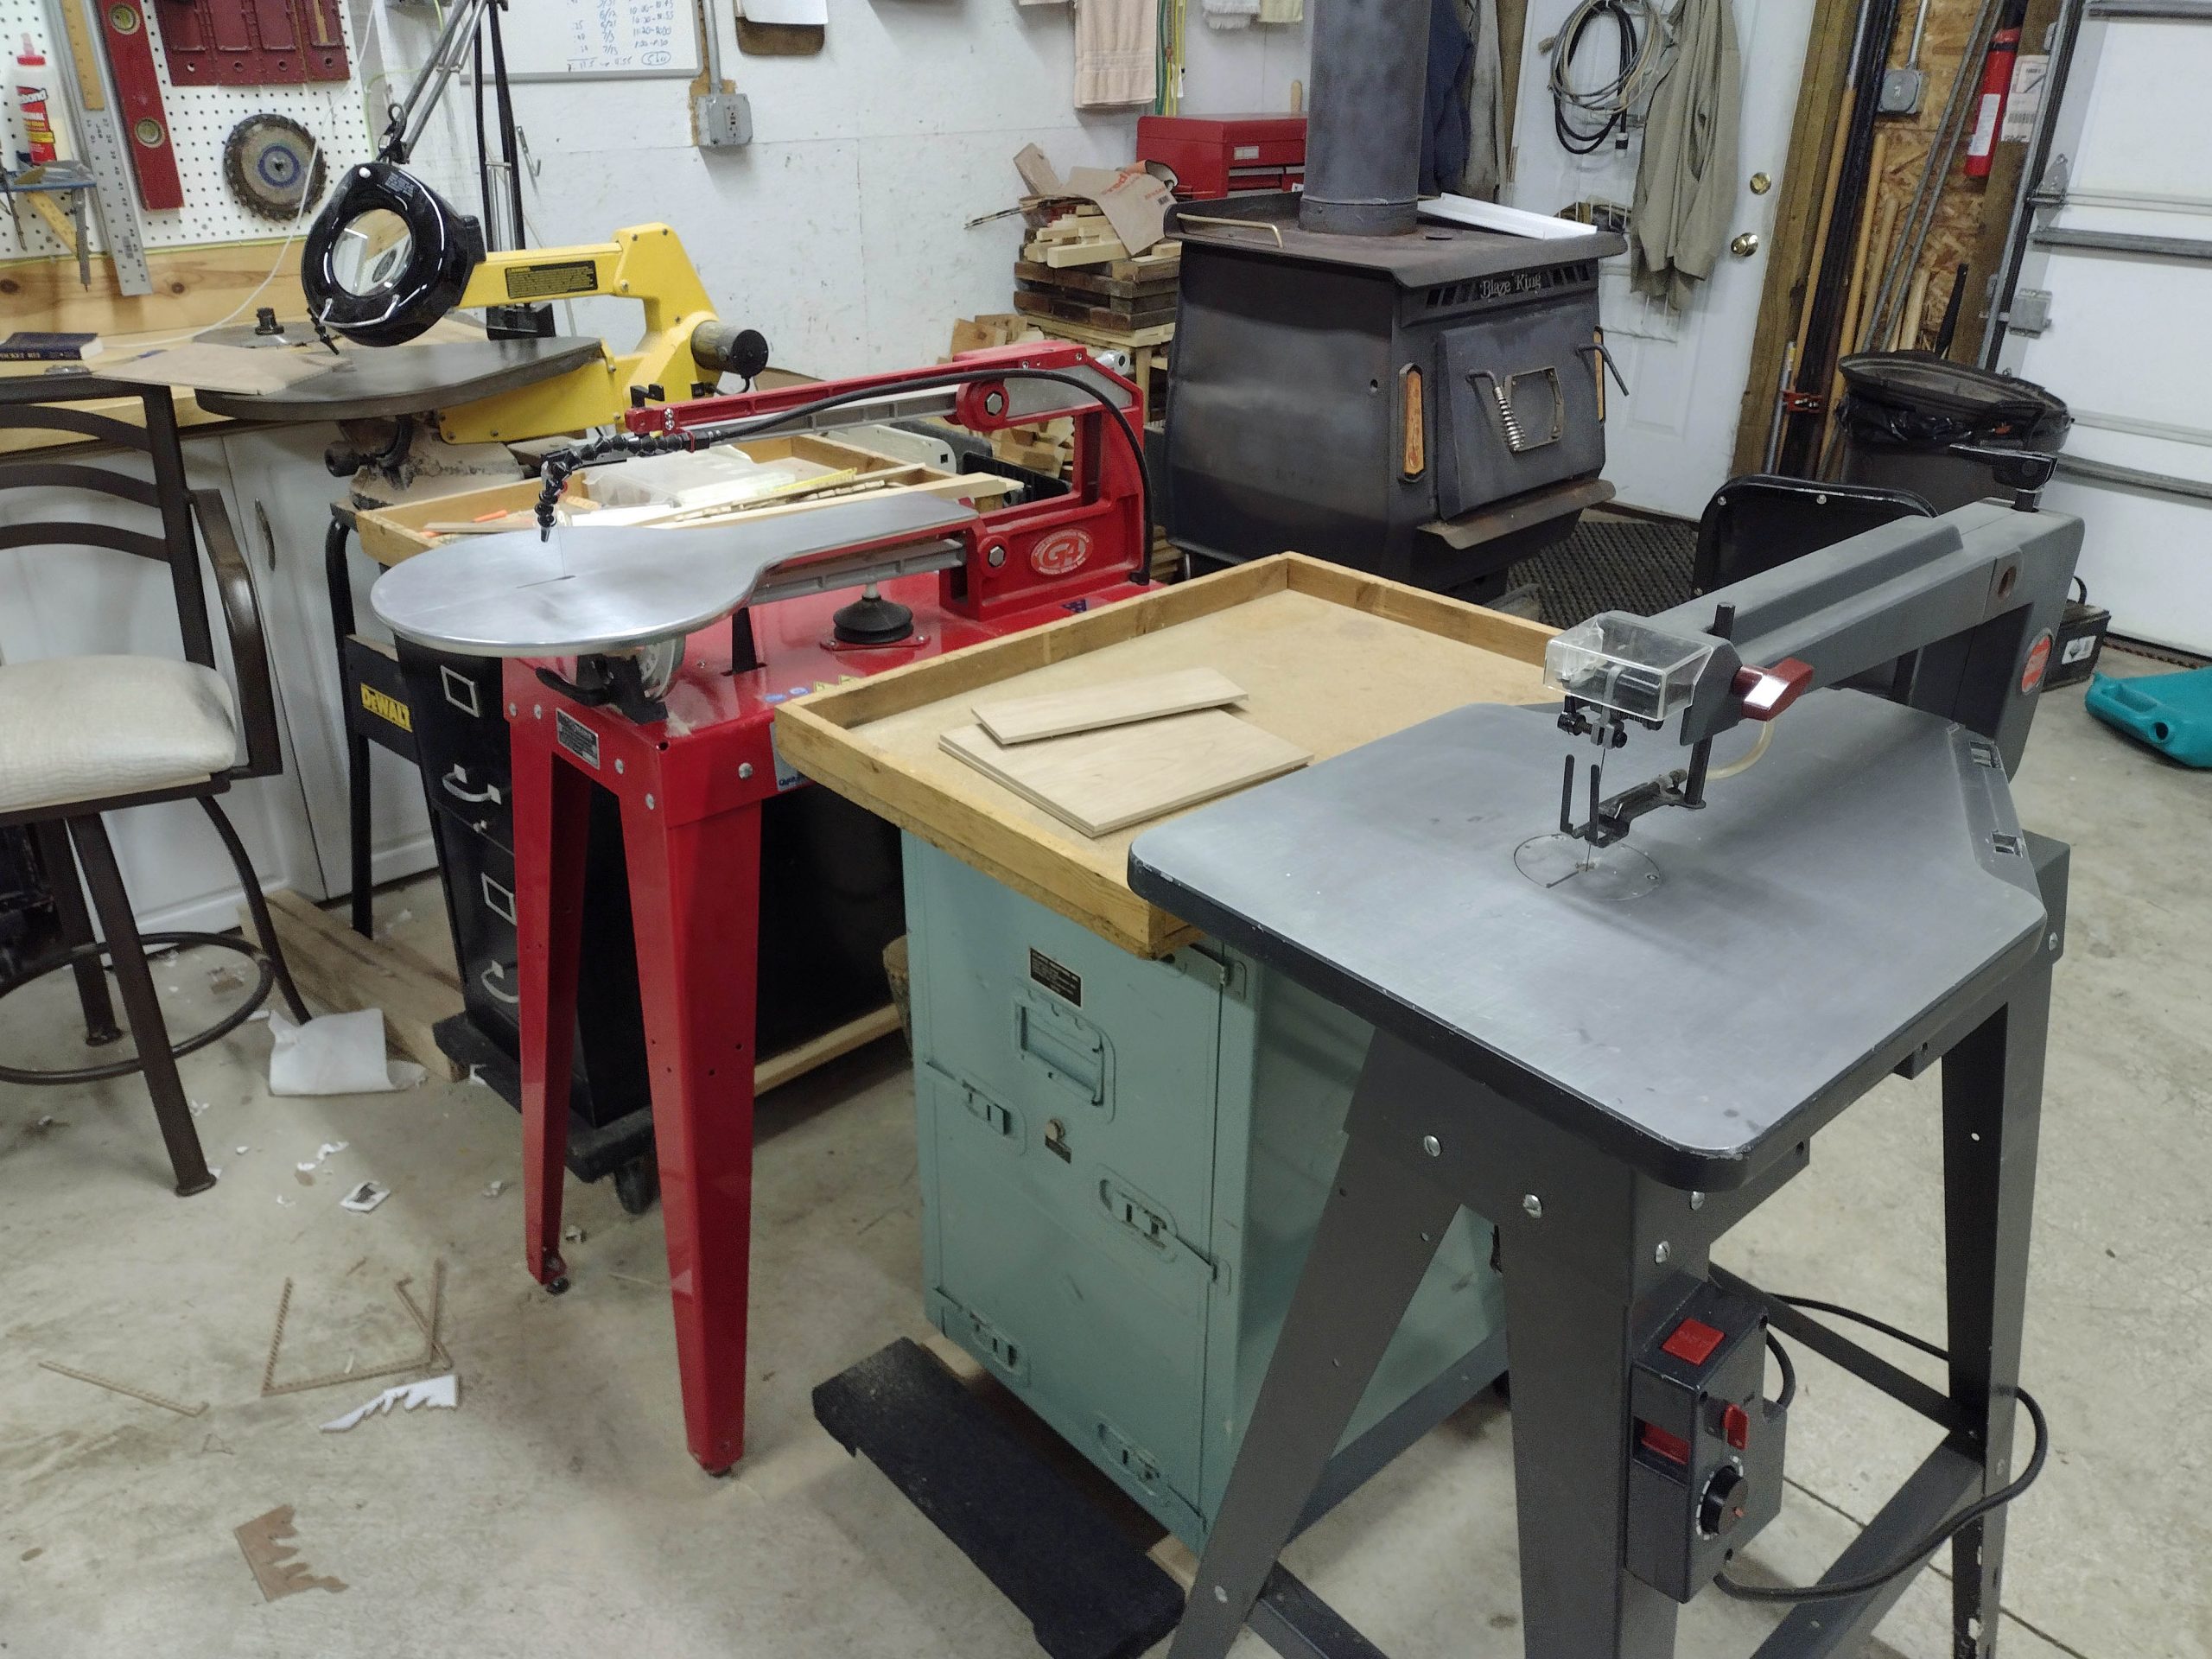
It turned out he had a wood shop in an unfinished area above the garage. He had orders to clear it out to make an apartment for his mother-in-law. As we were dickering over the scroll saw, he pointed at a radial arm saw and offered it to me cheap as well. I said “no, thanks, I am not a fan of radial arm saws.” He finally said he would sell it to me for $50 so he could tell his wife he got money for it. Then, he would pay me $50 to help him move it down the stairs! For $150 total, I brought home a nearly new radial arm saw, the Shopsmith scroll saw attachment, a router, and some other stuff. I asked him how he was going to turn the space into a mother-in-law apartment after selling off all his tools. He got a really hang-dog look on his face and said he wasn’t allowed to; they were going to hire a contractor so it would not take 5 years to happen. Poor guy.
The scroll saw is made of some sort of aluminum alloy casting. It is designed to be picked up and mounted on the Shopsmith, so it needs to be light and portable. Per the owner’s manual, it weighs 32 pounds.
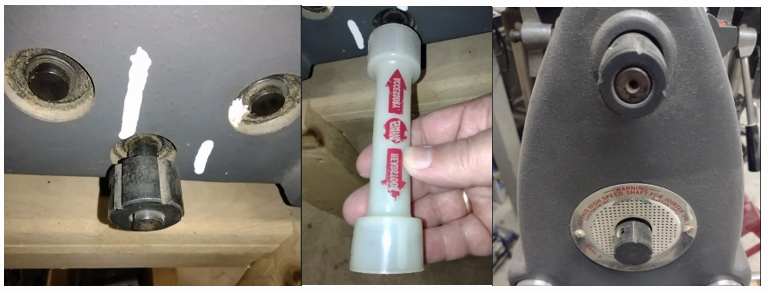
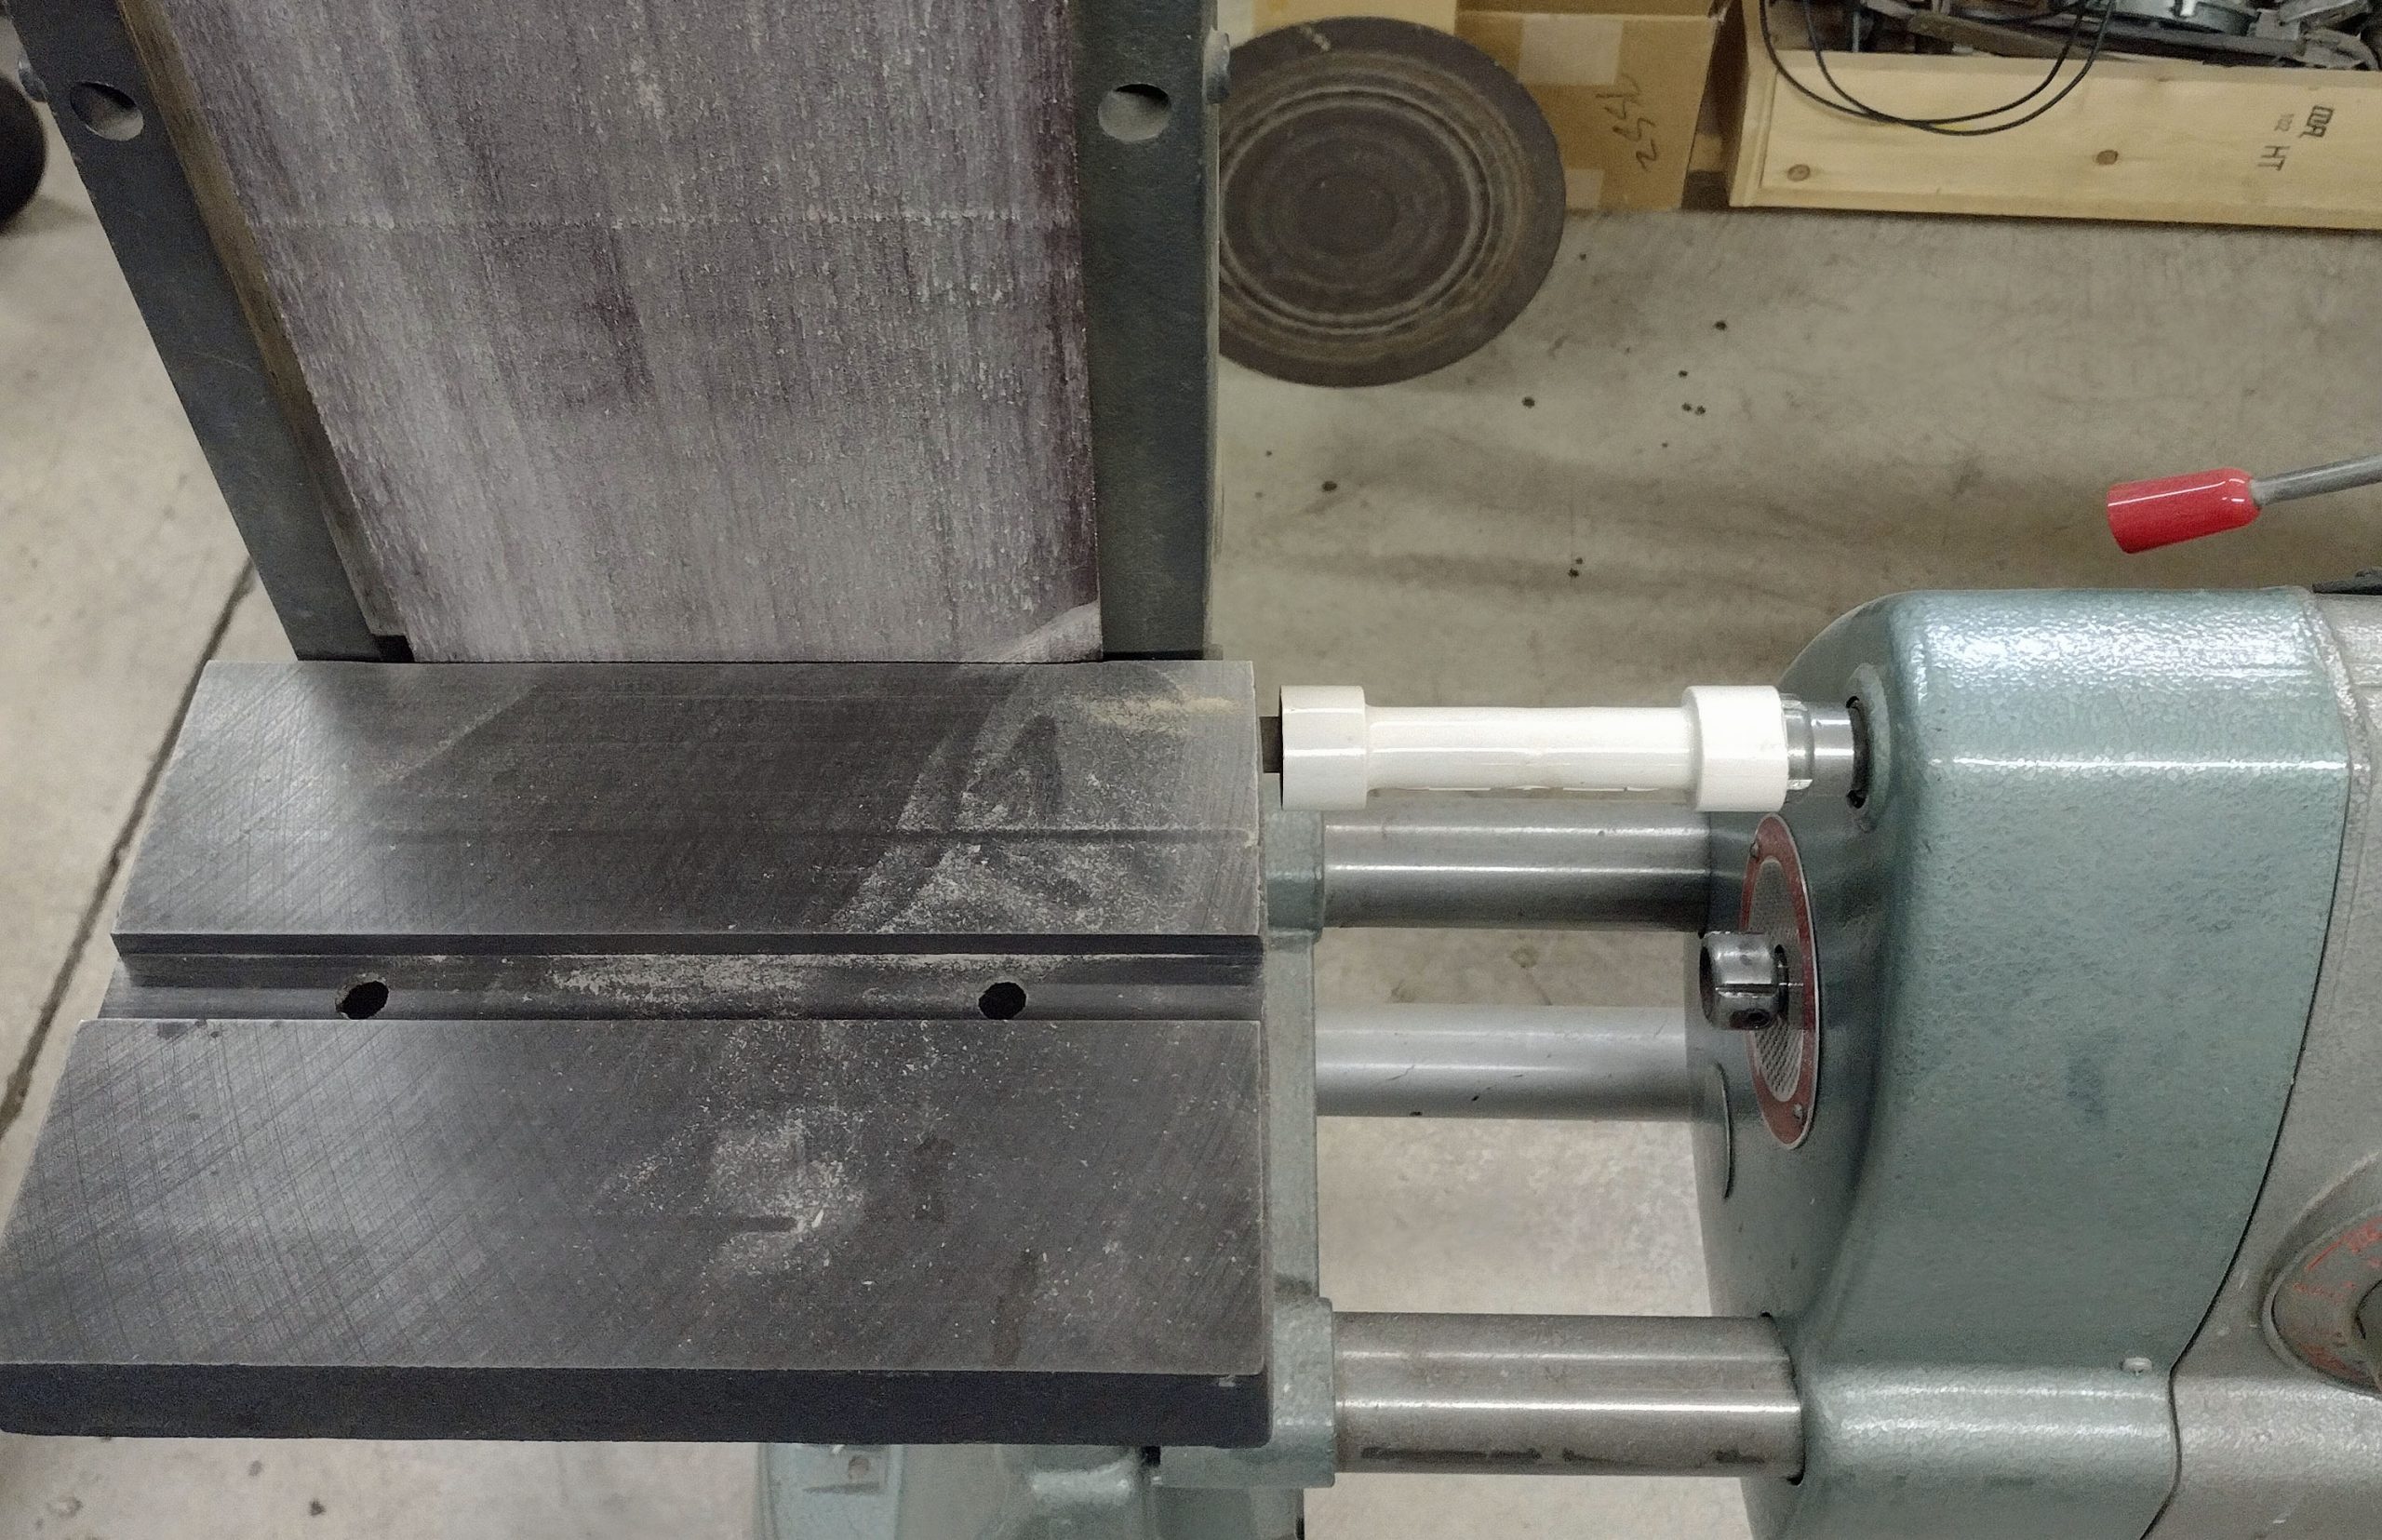
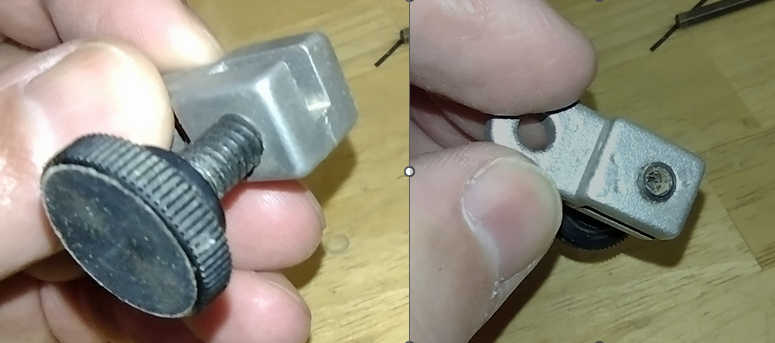
It mounts on the left side of the motor unit. The accessory drops into machined cylinders on the base unit, and then a plastic connector rod runs between the accessory and the motor unit. See picture below. The five grooved knob on the left is on the accessory, the white plastic thing in the middle is the drive link, and the upper four grooved knob is connected to the motor.
When it is all put together, it looks like the connection on this belt sander below.
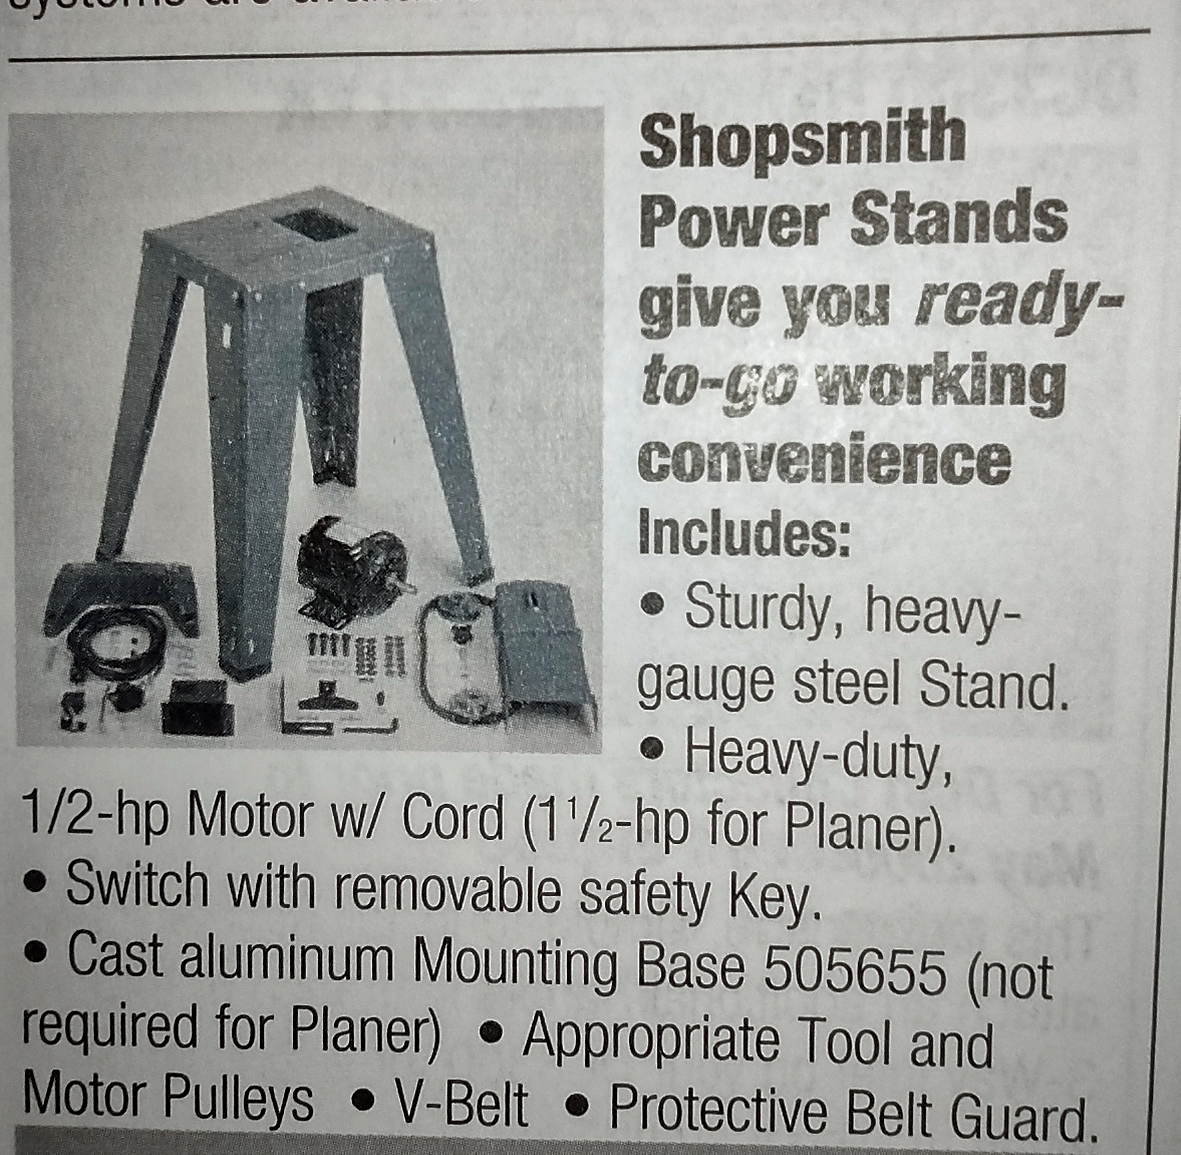
Shopsmith was pretty proud of these and wanted a premium price for them to buy a new one. They also sold other options for using your scroll saw accessory. You could buy a “Power Stand” that the accessory permanently mounted to. This included a motor, belt, and everything else needed to turn the accessory into a standalone tool.
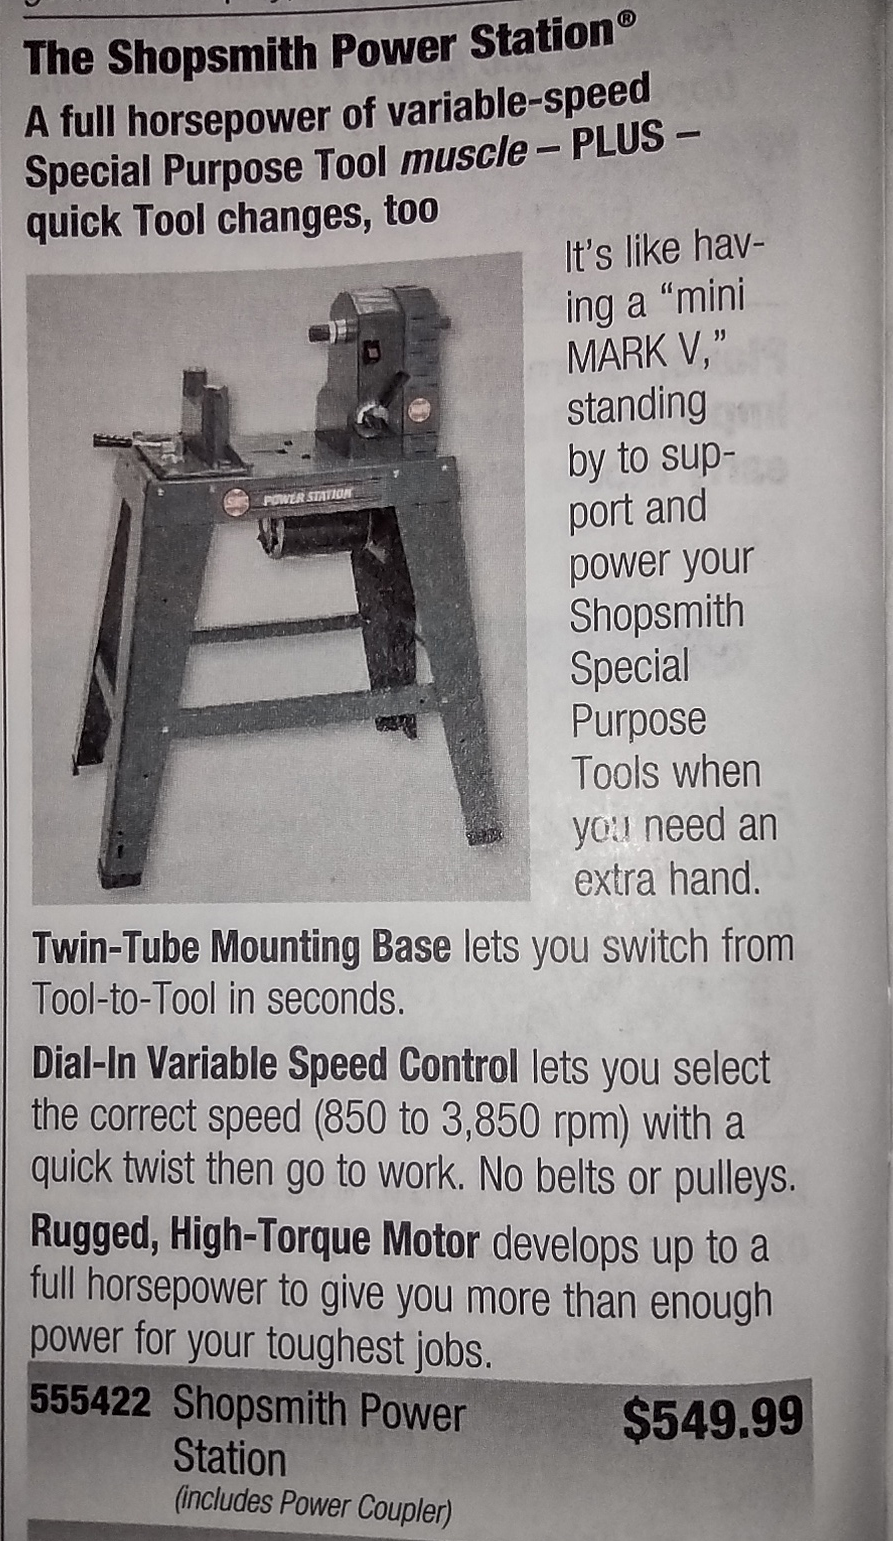
You could buy a “Power Station” that you mounted the accessory on to use it, but then take that accessory off and mount a different accessory, such as a belt sander.
Or you could even buy a standalone Shopsmith Scroll Saw from the get-go, which was completely different from the “power stand” option. They had their own stand and variable speed DC motor. I bought one of these from a Craigslist ad a few years ago and gave it to my daughter.
I bought my Shopsmith attachment around 1998 or 1999. I cut with this saw for years and am/was quite happy with it. However, I came to realize that I was putting a lot of time and wear on my expensive Shopsmith unit doing a function I could do with an inexpensive used stand-alone saw. So, I started looking in the local ads again for a different saw, and that is how I ended up with my DeWalt.
I wanted to cut a puzzle with a Shopsmith scroll saw for the comparison. I decided to borrow my daughters standalone Shopsmith scroll saw which I had given her as a gift a few years ago. It is functionally the same machine as my attachment. In fact, even the base casting is identical to mine. It has the cylinders in the bottom for placing the mounting tubes to put on the Shopsmith unit. The only real difference is that it has its own electric motor and a steel four-legged stand. The owner’s manual says it weighs 62 pounds.
Blade mounting – as originally delivered, these used blade clamps that need to be tightened with an allen wrench. This was not an uncommon system decades ago. Many saws used a blade clamp that required a separate tool.
Also, on the constant tension parallel arm saws, the distance between blade clamps HAS to be maintained as the same each and every blade change to prevent having to readjust the tension. So, you need to make sure the blade is inserted all the way to the end of the blade clamp. This is true for the Hawk saw as well.
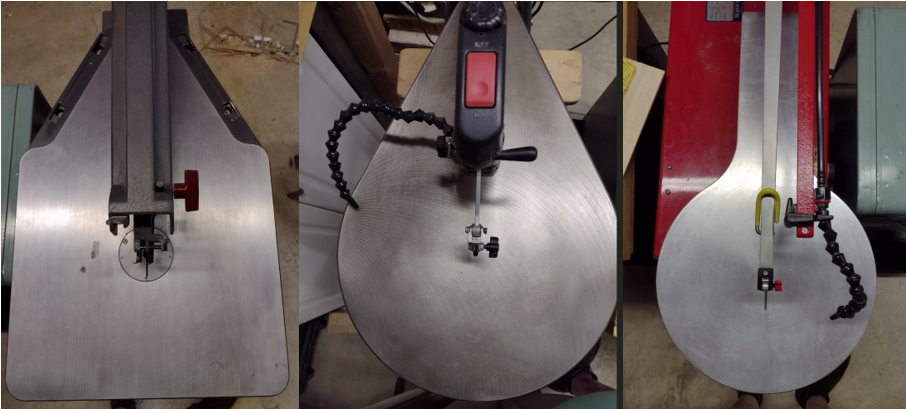
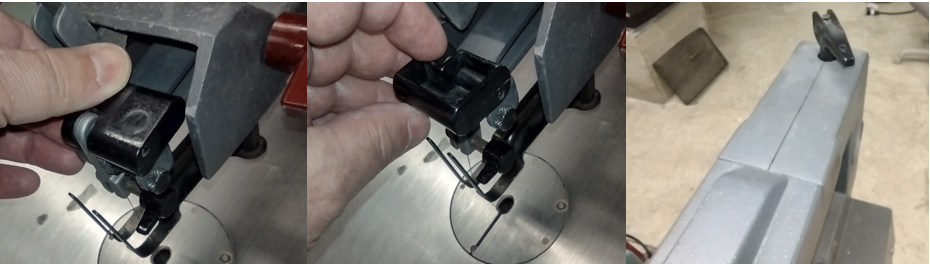
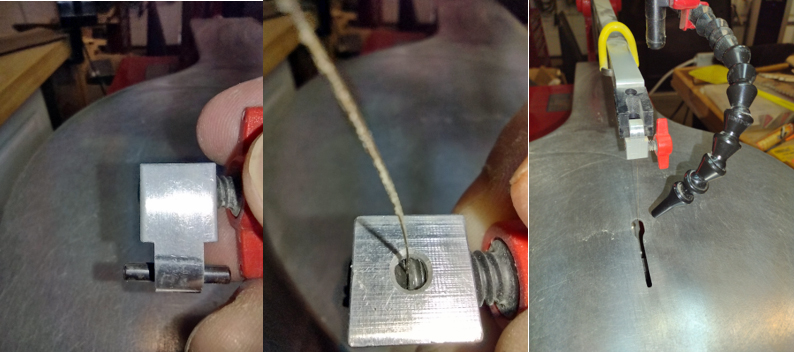
Once the blade is mounted in the lower blade clamp, you install the clamp in the saw. If you look down through the table, you can see the retaining mechanism. You pull out the spring pin, insert the clamp, let go of the spring pin, and replace the table insert. See the below picture. With practice, you can do this quickly by feel without looking or removing the table insert. (In the middle picture of the three, below the blade clamp, you can see the dust collection intake.)
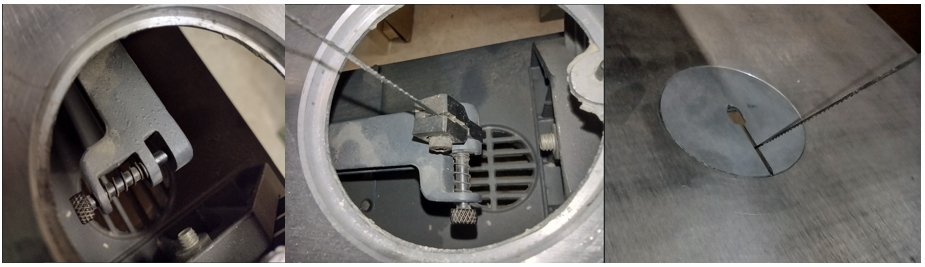
You see the long slot in the insert. This is so you can tilt the blade forward so you can insert the blade through the bottom of a piece of fretwork you are working on. Not normally needed for puzzle cutting, but good to know for other stuff. With the Shopsmith saws, you can only bottom feed because the upper arm does not lift up. Bottom feed means to insert the blade into the bottom of the work piece before placing the blade in the upper clamp. With the other saws I have, you can either bottom or top feed.
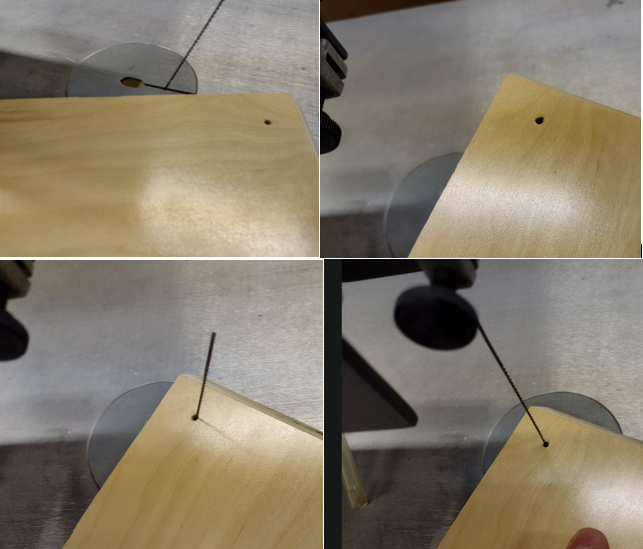
If there was a pattern on the piece of wood, I would run the saw to cut out the piece of waste material. If you are doing a large fretwork project, you would do this many hundreds of times. It has to be quick and easy to do.
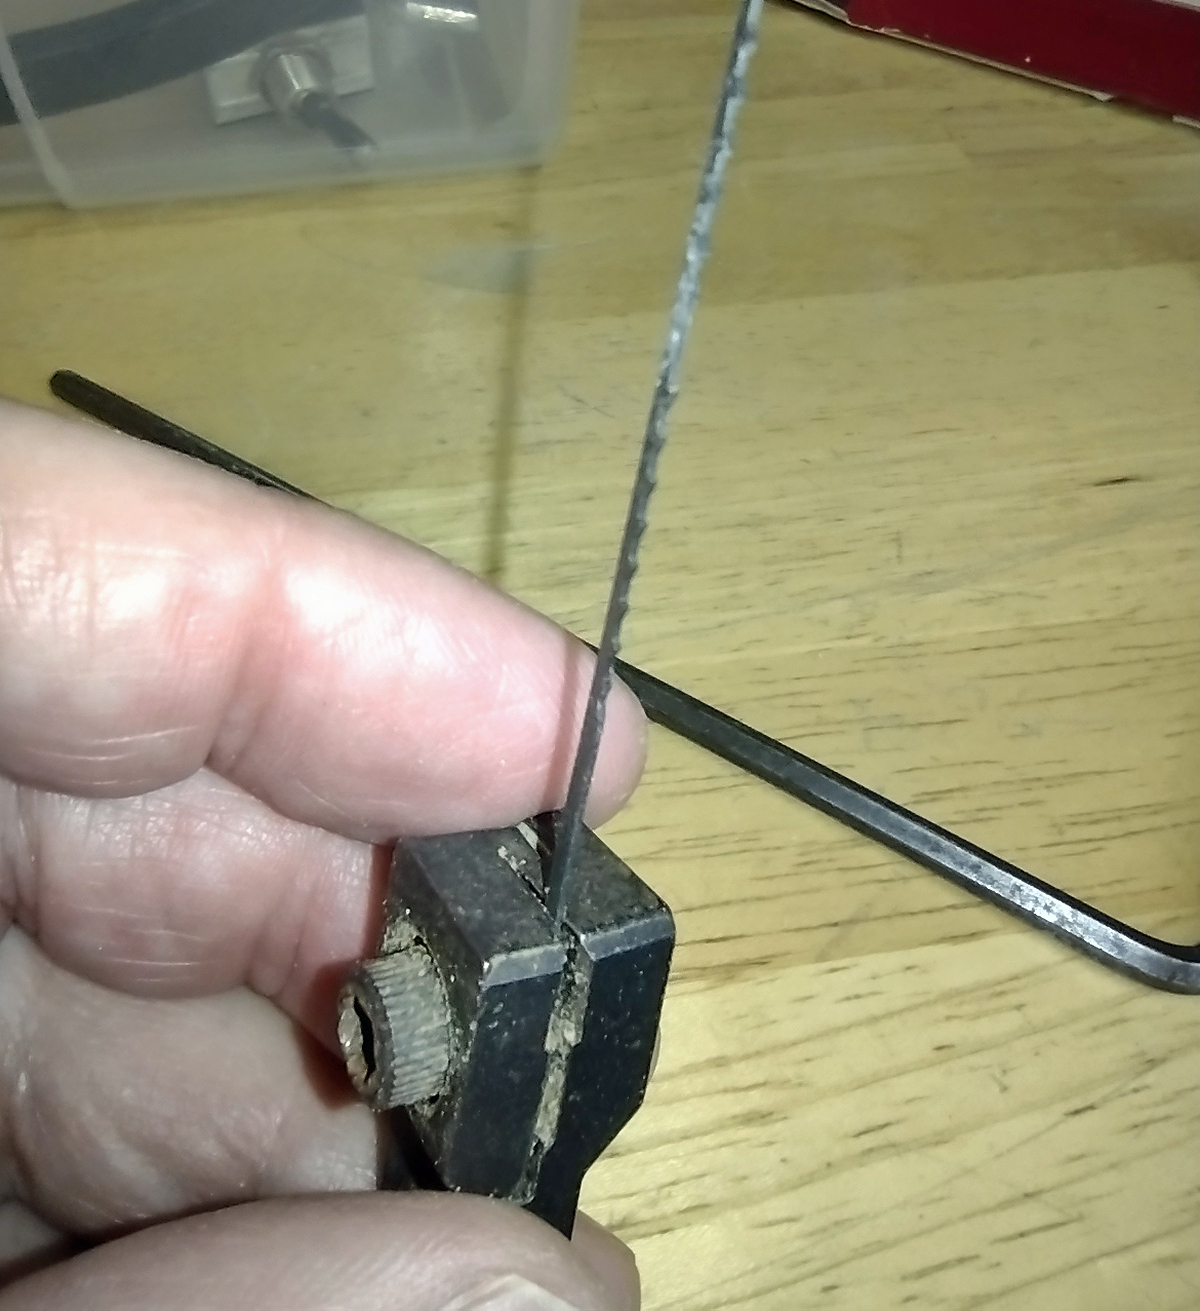
Shopsmith came out with an upgrade option to do away with the allen wrench. The new blade clamps now have a thumbscrew on them. I ordered these for both saws as soon as I bought them.
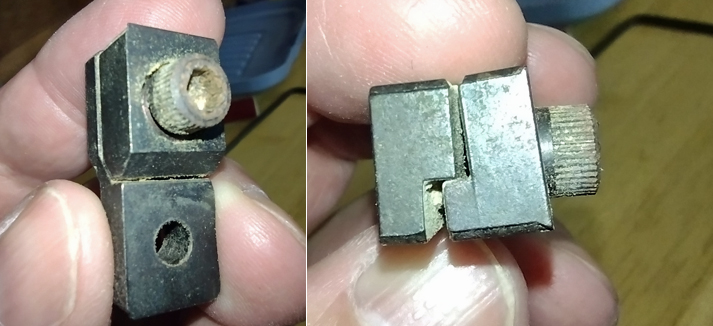
You still need to fully seat the blade all the way down and all the way back in the clamp. In the picture below, you can see that even mounted all the way to the back of the clamp, the two screws firmly engage the small 2/0 sawblade. One the blade is installed, the clamp is still mounted on the saw in the same manner as before.
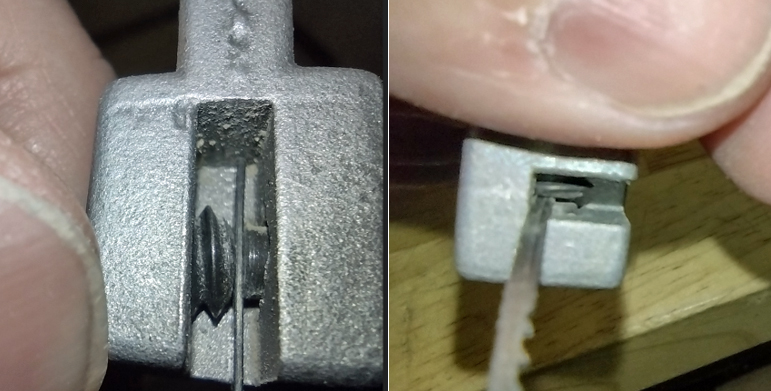
You can also see that with the new style clamps, there is a set screw opposite the thumbscrew. The blade is firmly clamped between the two screws. You can adjust the set screw to move the blade left or right in the clamp. This is to align the blade side to side to ensure it is perpendicular to the table. Otherwise, the blade will be slanted, and you will create a wider saw cut than the blade.
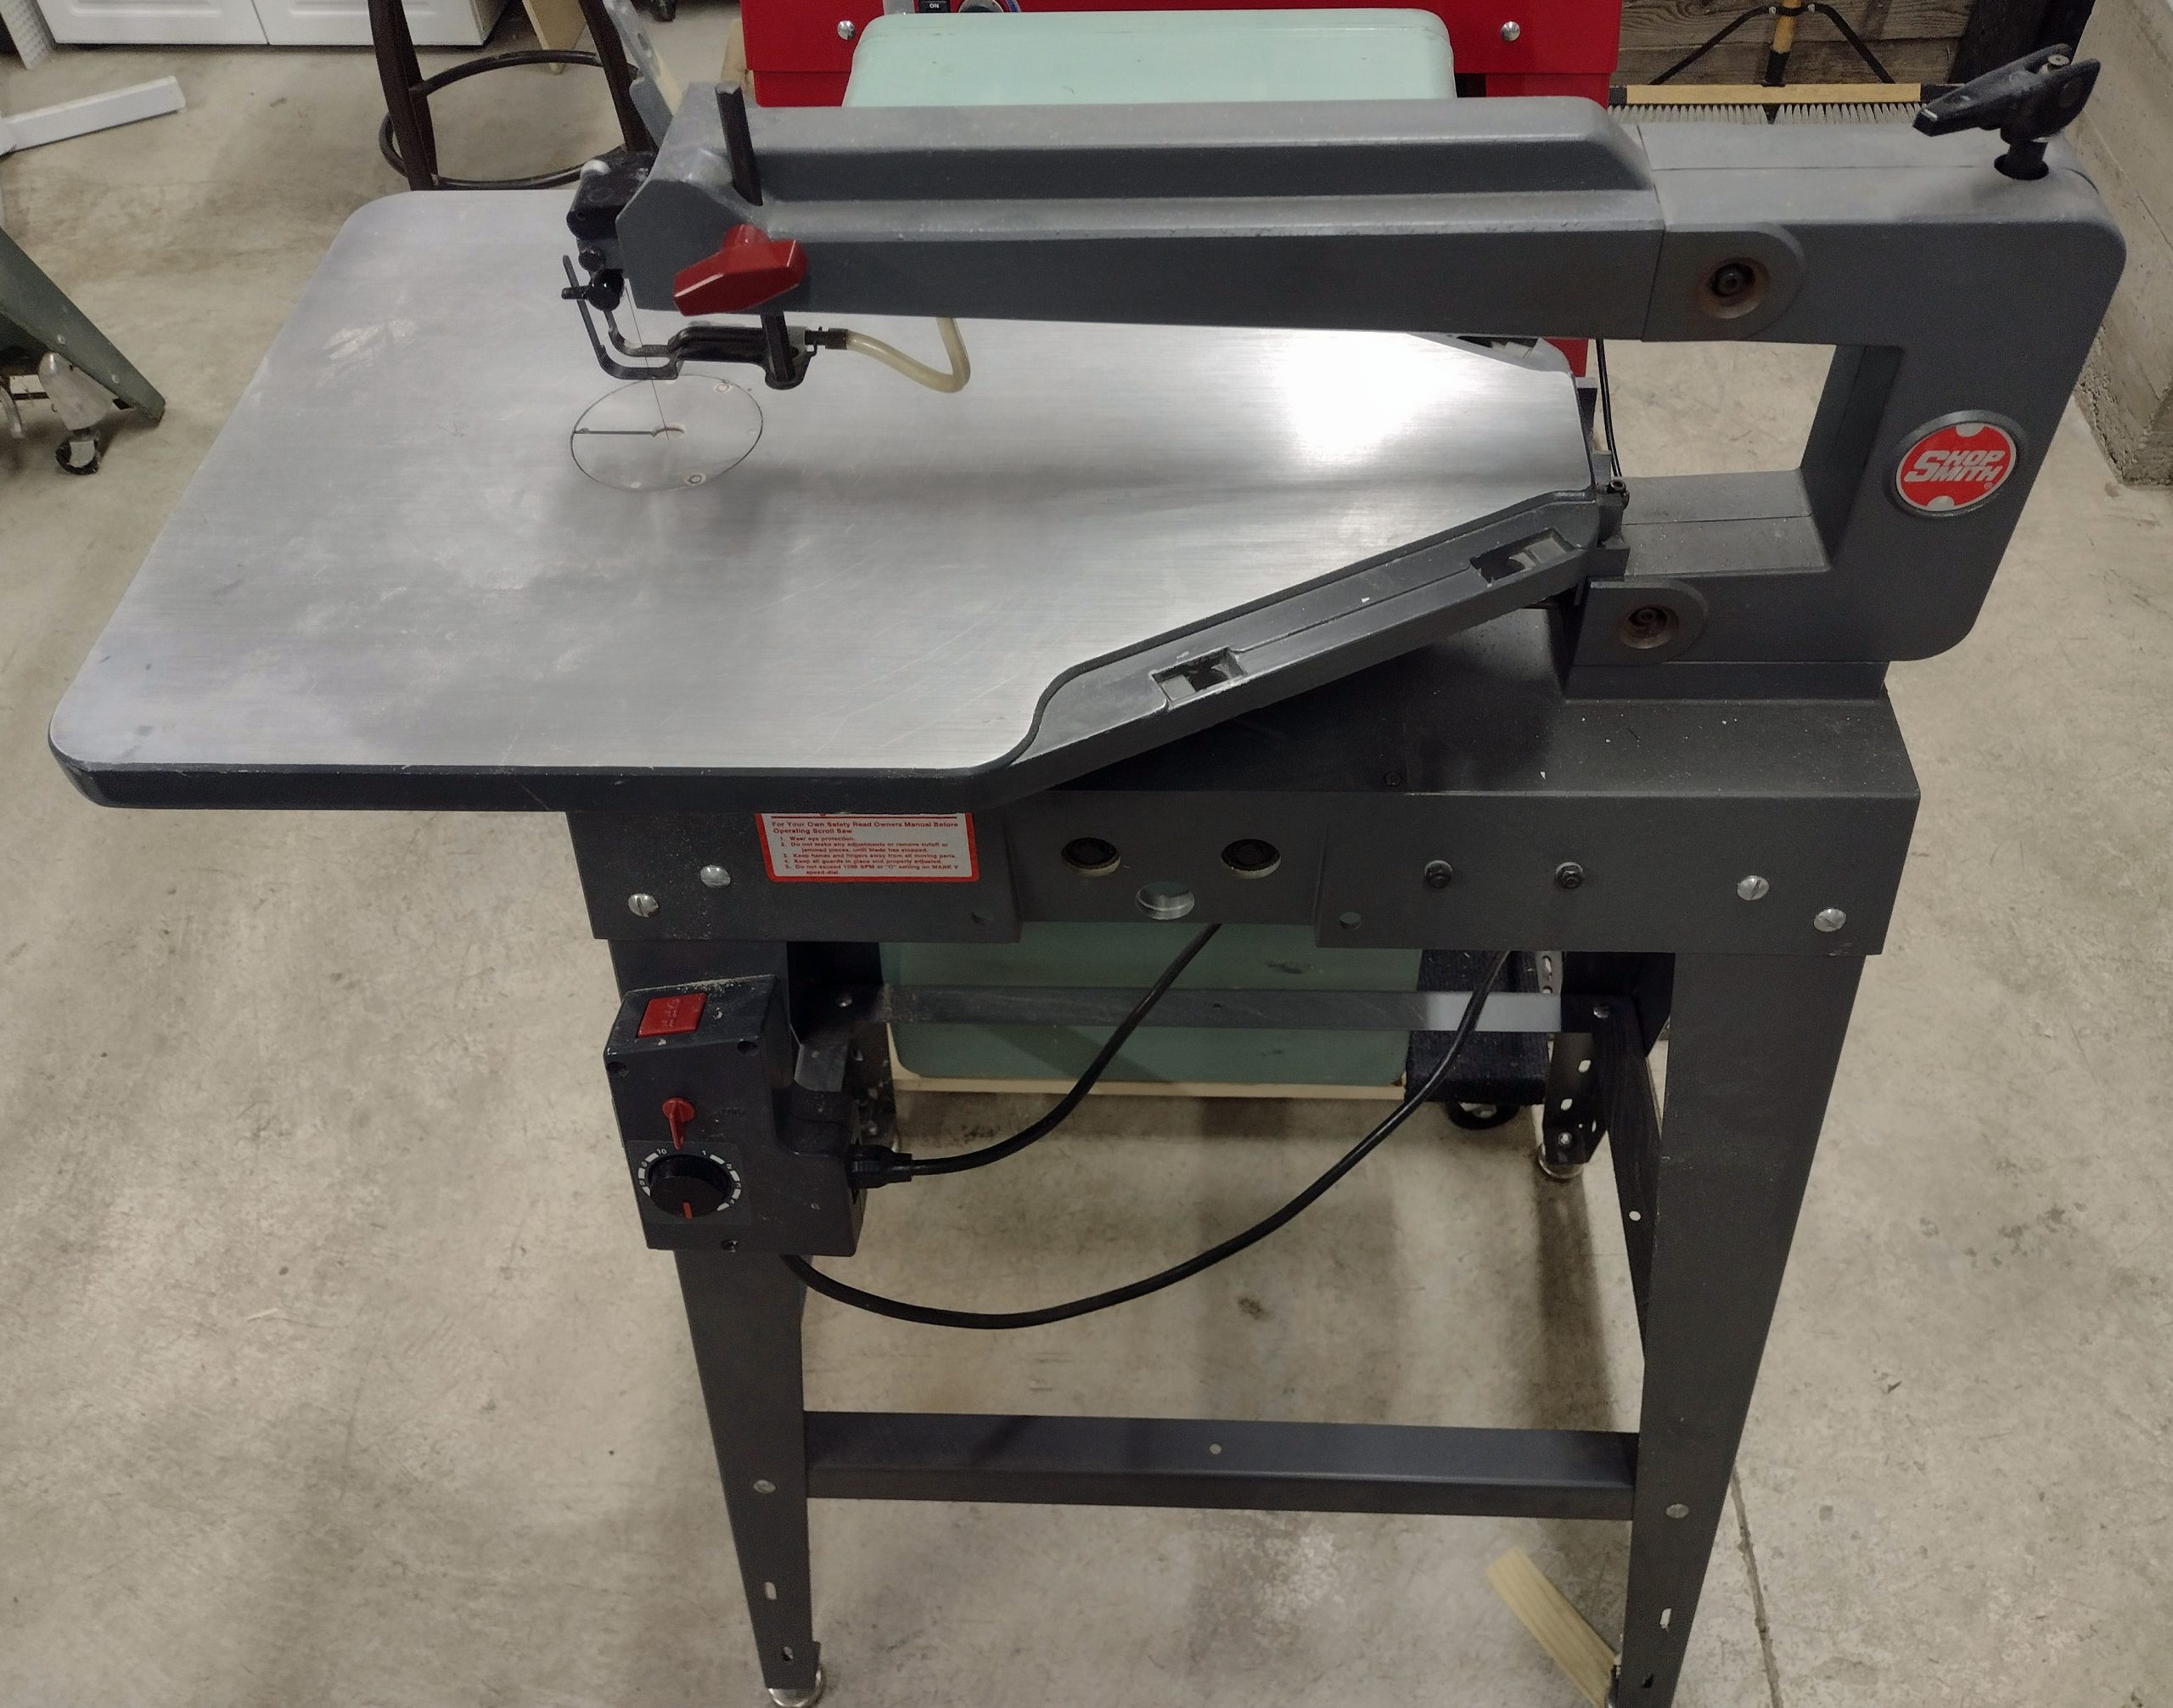
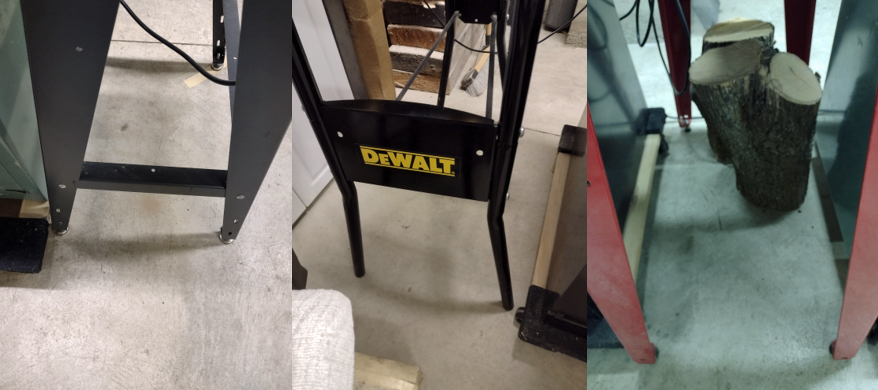
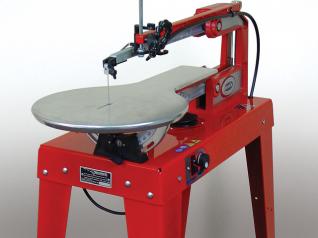
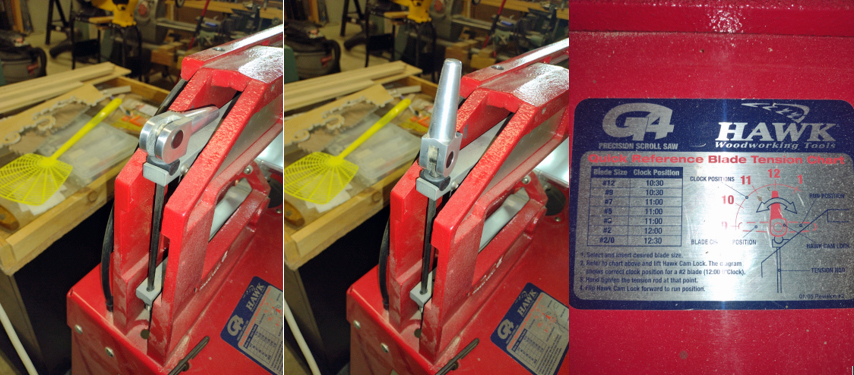
It has the largest cutting table of all three of my current saws. Picture below.
In the below picture, you can see the salient parts of the saw. The upper arm is “protected” by a cover piece. The tension adjustment knob is in the upper right. You install the blade as previously mentioned. Once the blade is installed, you adjust the tension knob. You are supposed to achieve a high “C” note when you pluck the blade.
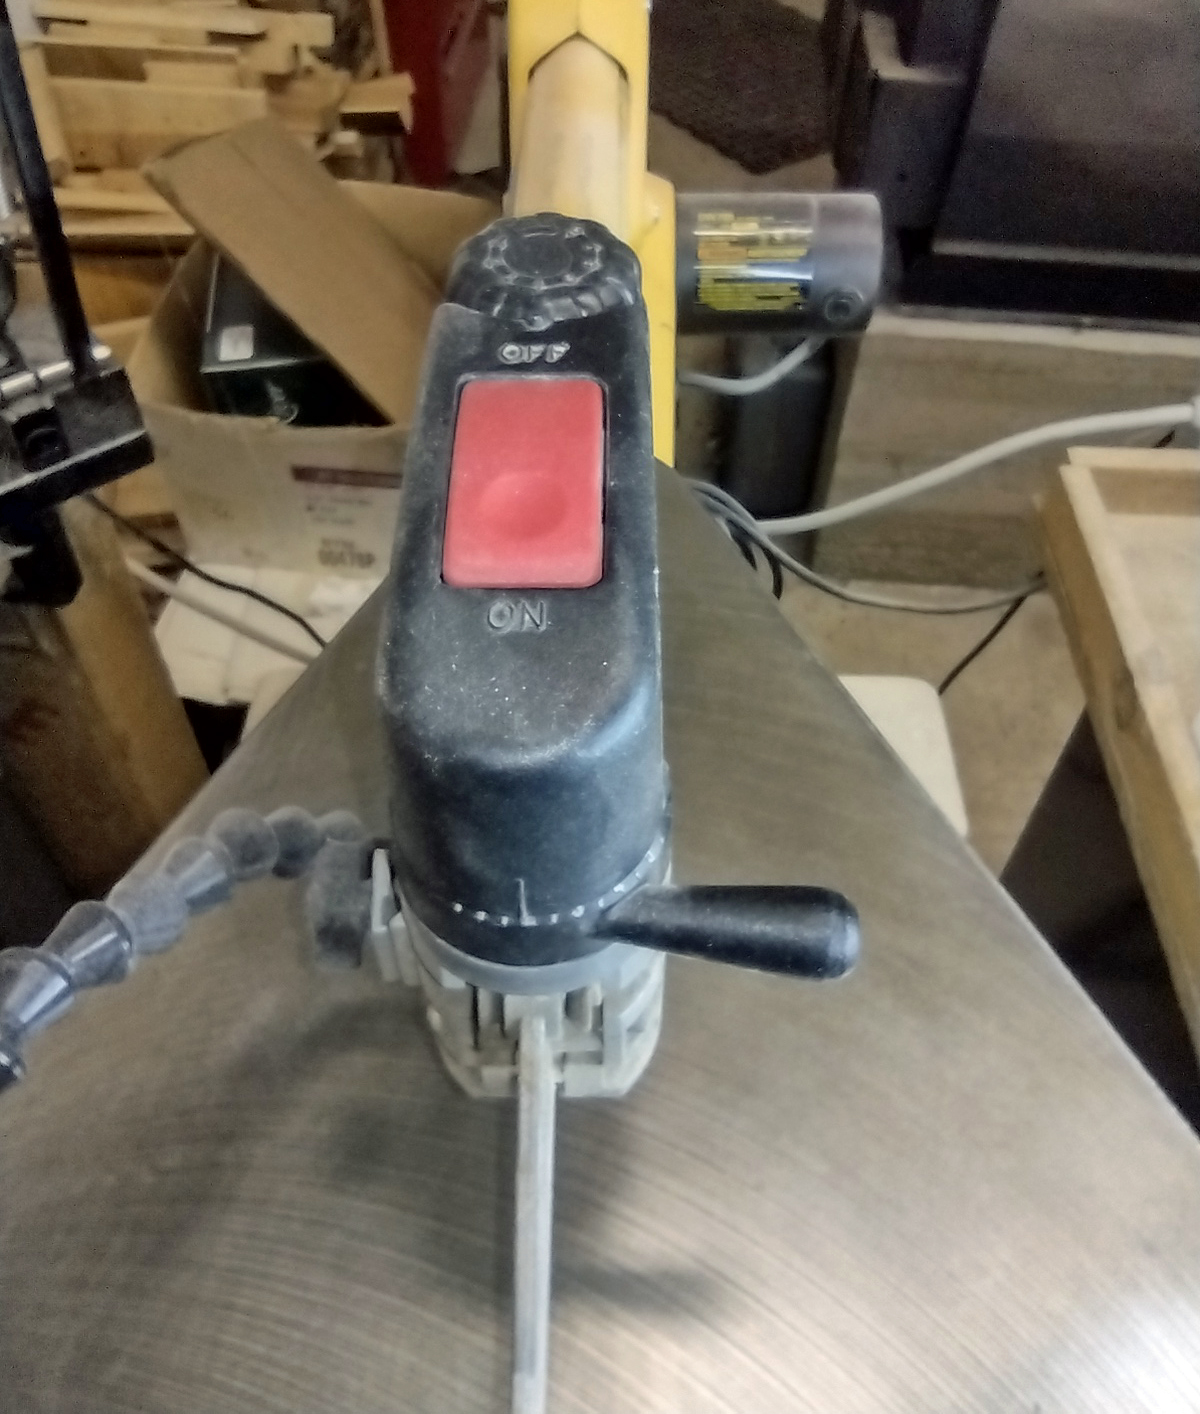
The red knob on the left of the upper arm is to control the height of the hold down foot and air hose. I normally take these off, as the hold down foot really messes with visibility and control of what you are doing. But this is not my saw, so I left it alone. Also, the air hose is an integral part of that foot. The air hose blows the saw dust away from the blade so you can see what you are cutting. If this was my saw, I would remove all that and find an articulated airline like the other two saws have. More on those later. The box on the lower left leg is the control box. It rectifies the incoming 120-volt AC current to 85-volt DC. The round dial controls the speed of the motor. The sliding “on” switch is actually on the front, but the big red button on top is the off switch. The little red thing above the speed dial is the child safety lock control that when removed, keeps the saw from running. If you look at the legs, you can see each leg has its own adjustment to level the saw and keep it from rocking.
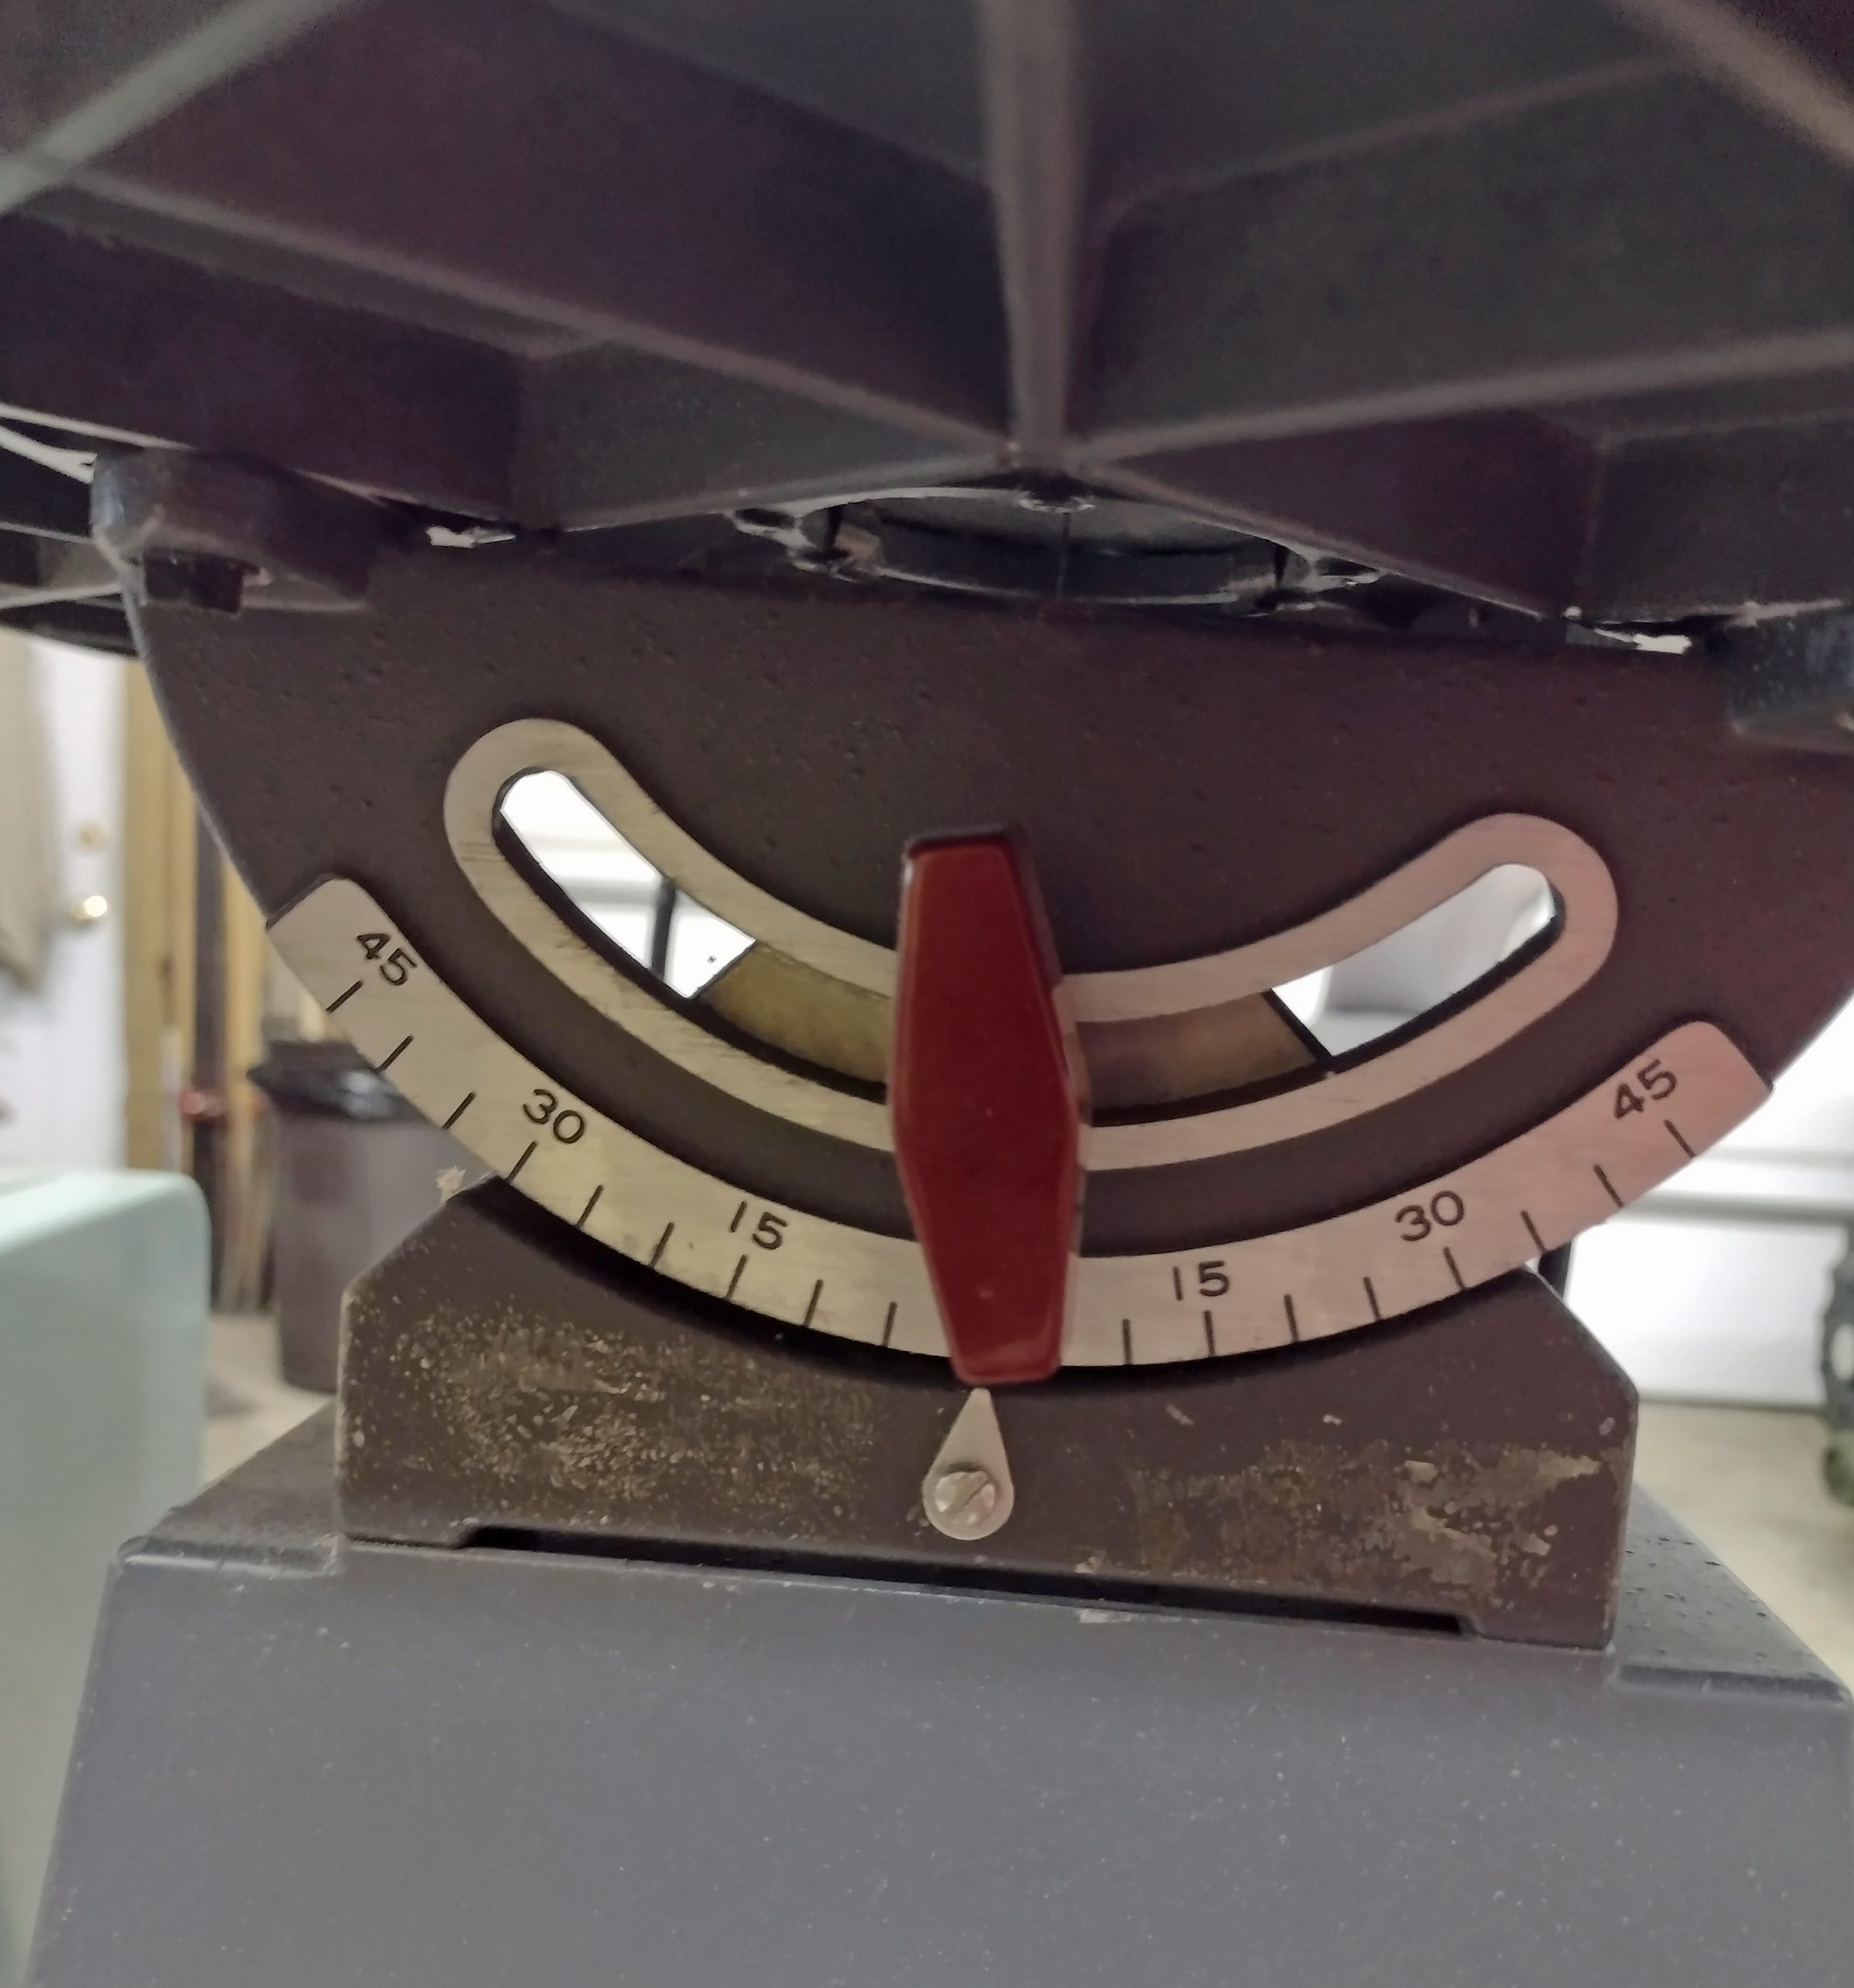
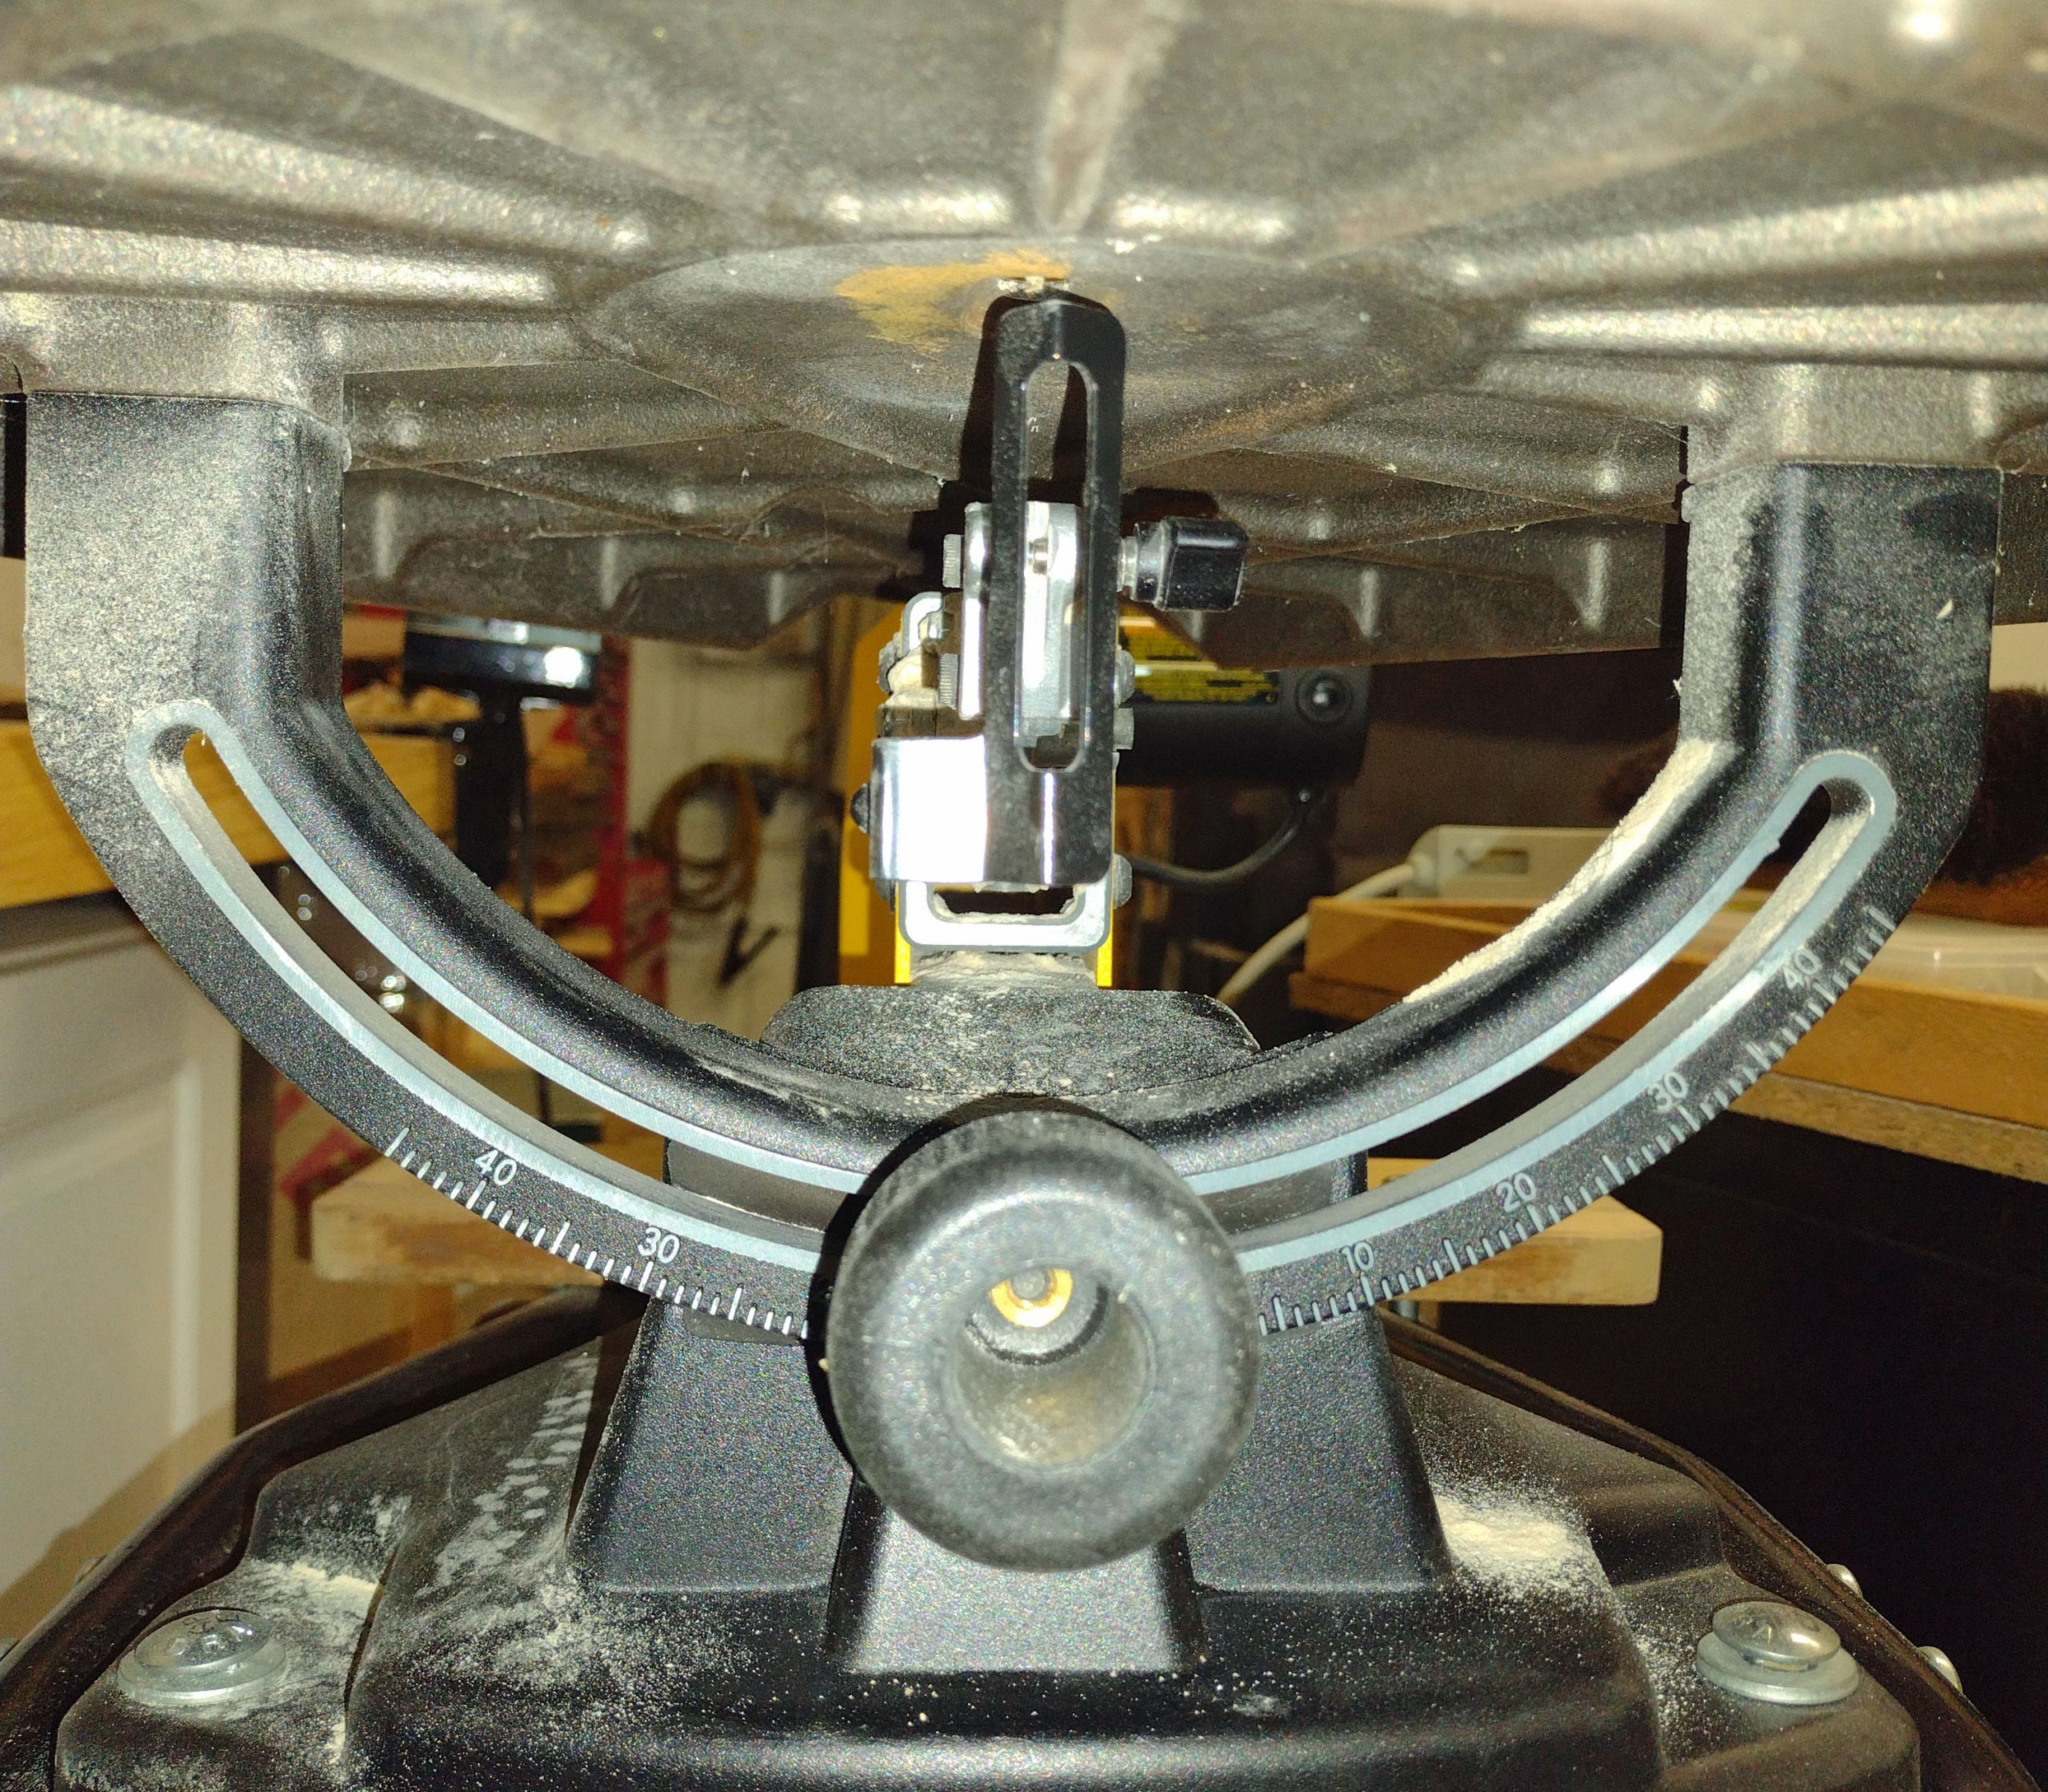
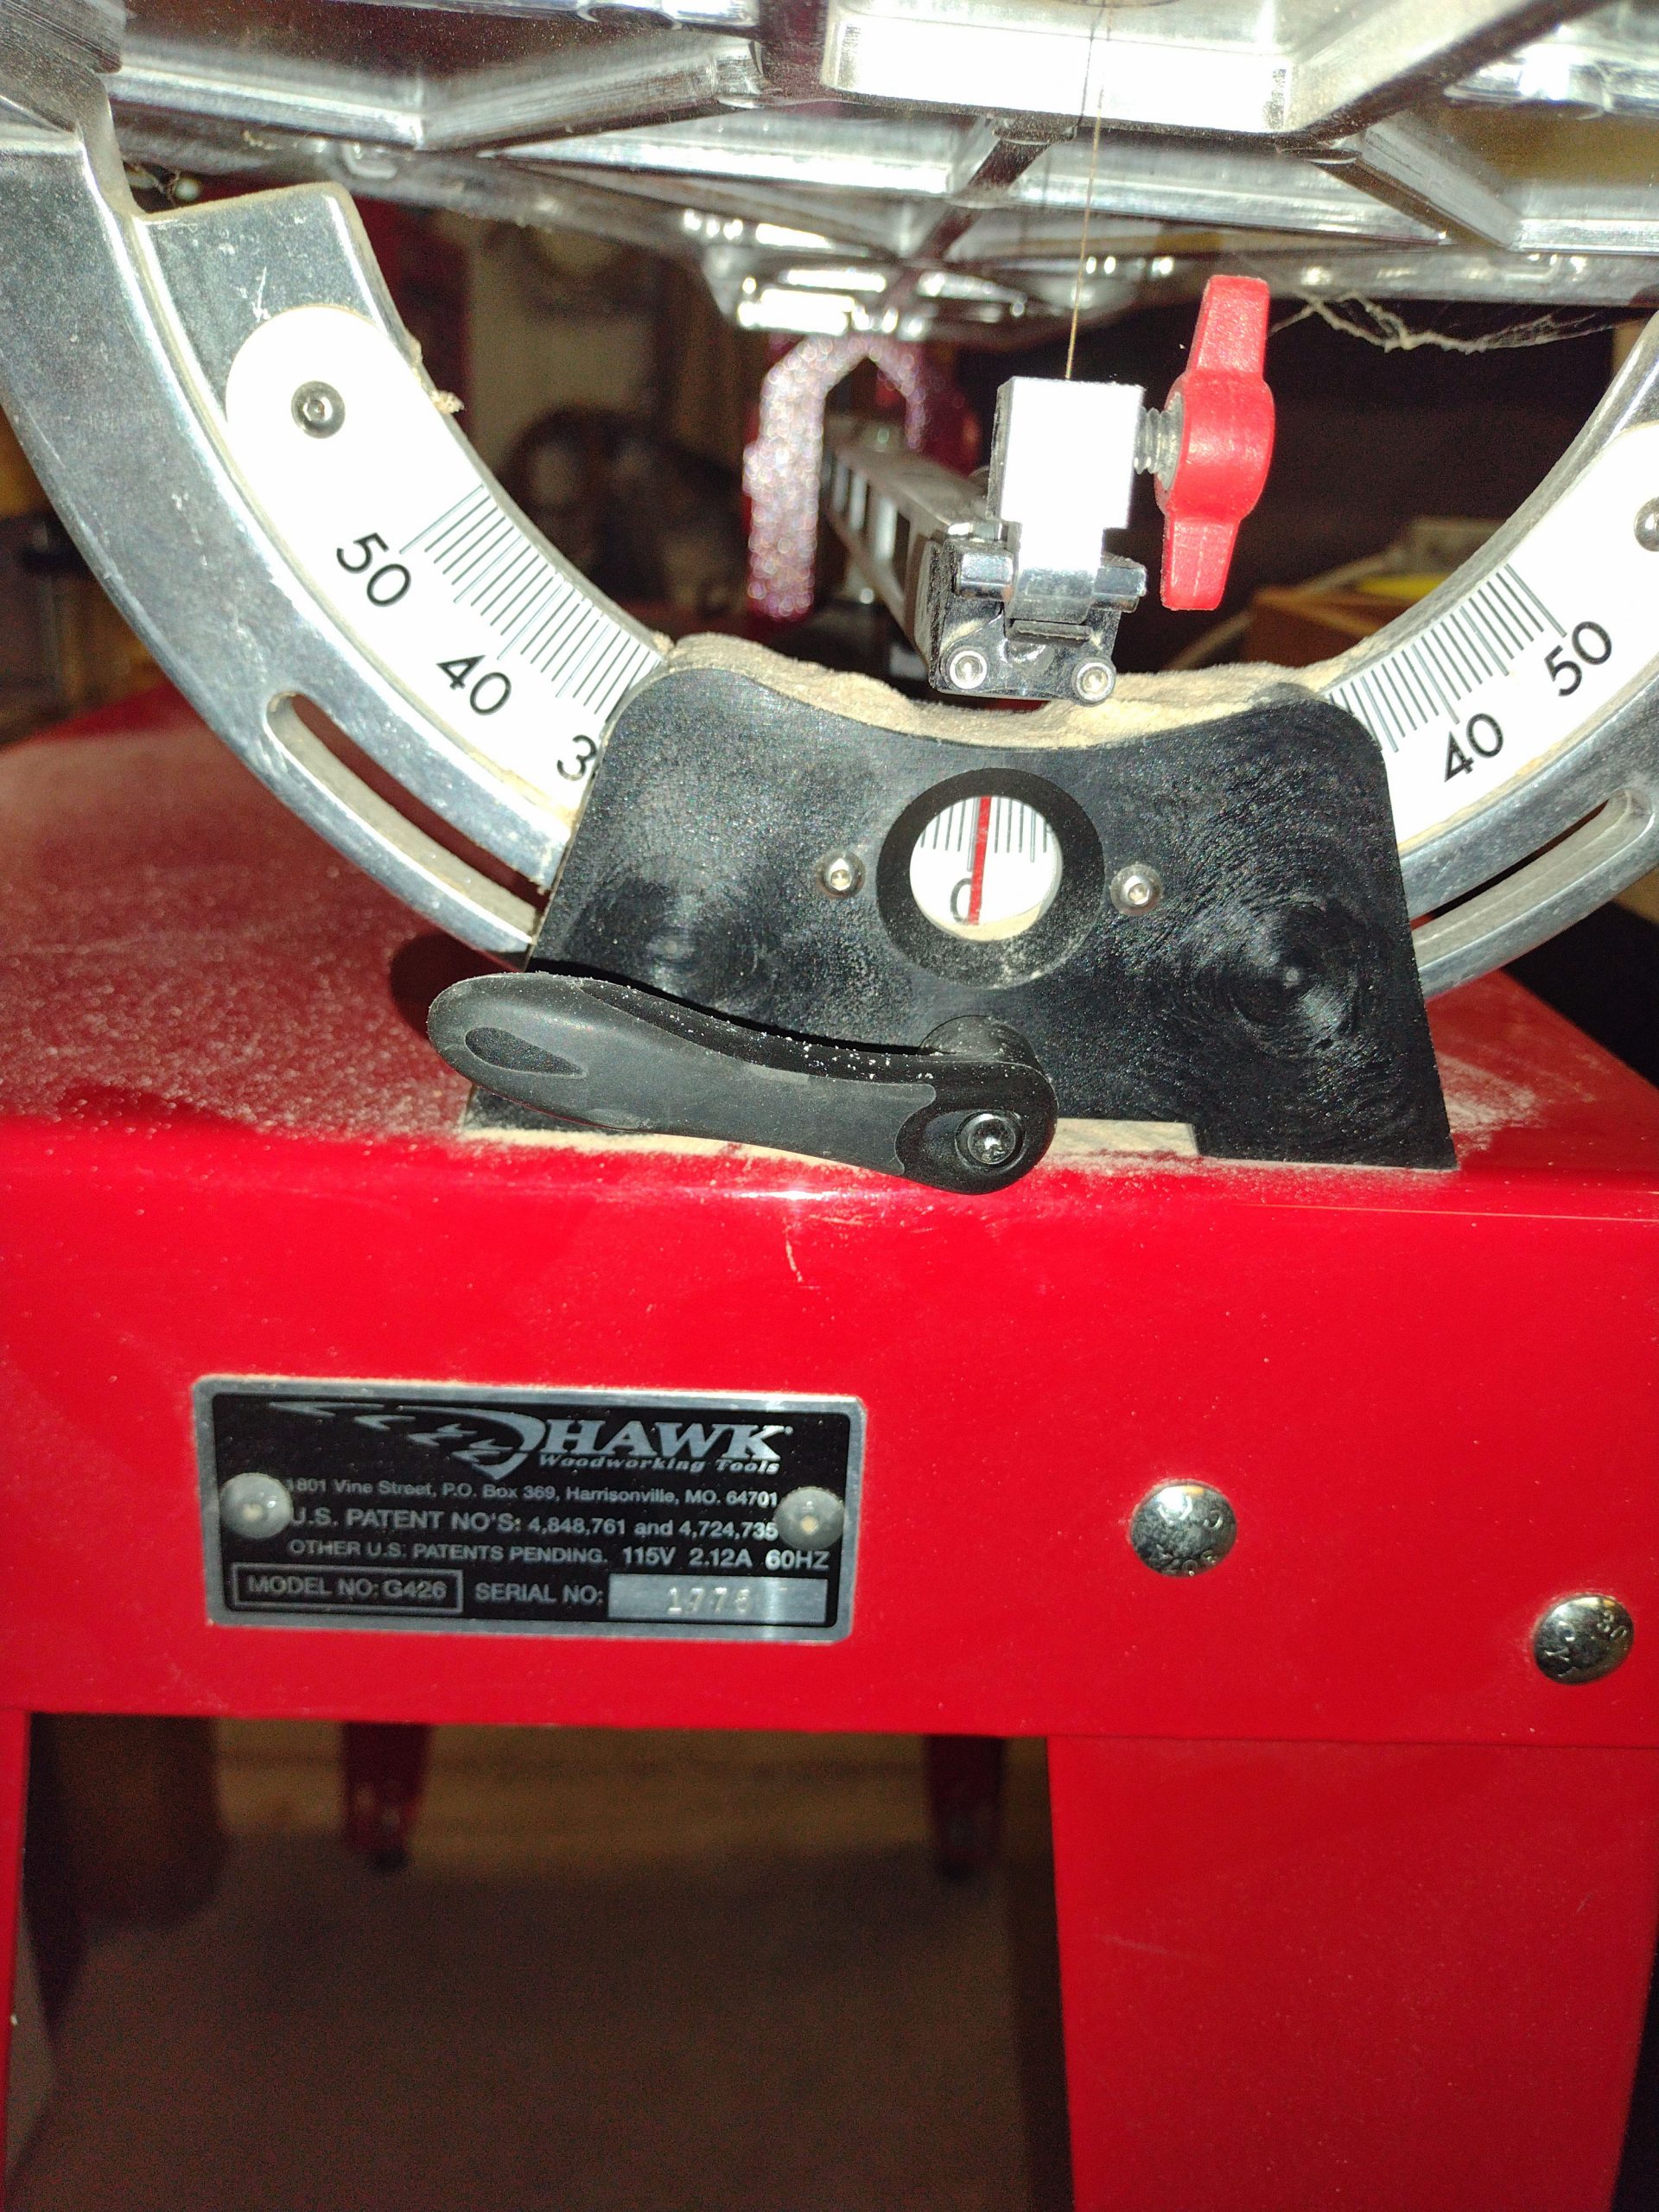
Under the table, you can see the tilt adjustment goes from 45 degrees left to 45 degrees right.
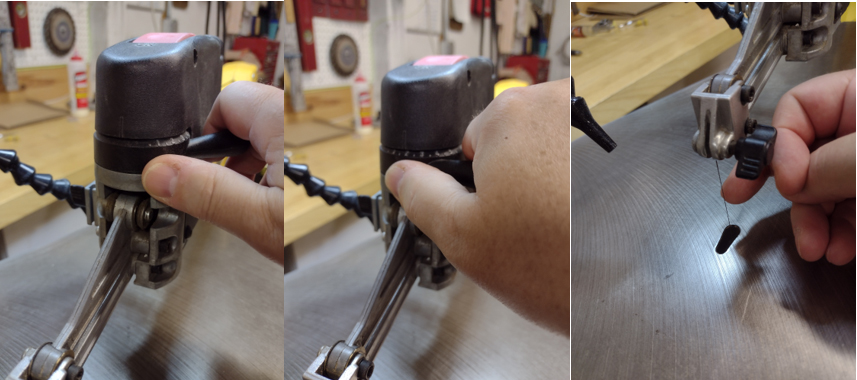
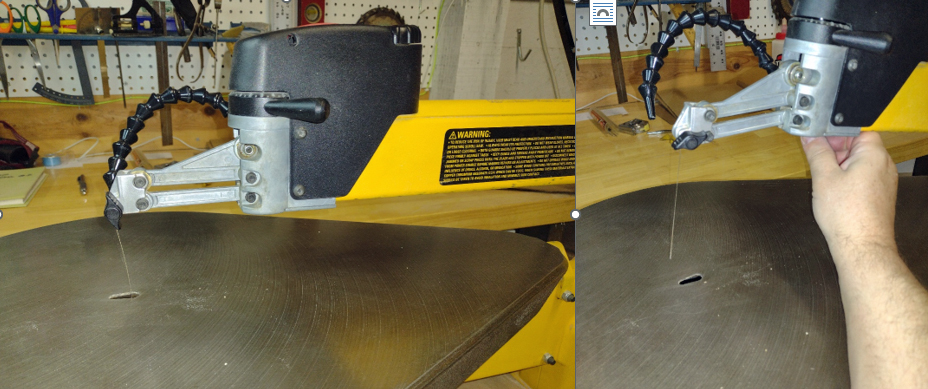
These shots below show the blade release lever for blade changes. The black plastic piece my hand on is that lever. You pull it forward to release the blade tension so you can remove the blade. You change out the blade and then push the black piece back into position. If you are using the same size blade as you were, the tension should still be set. If not, you can reach back to the tension adjustment knob on the top back of the saw to adjust the tension.
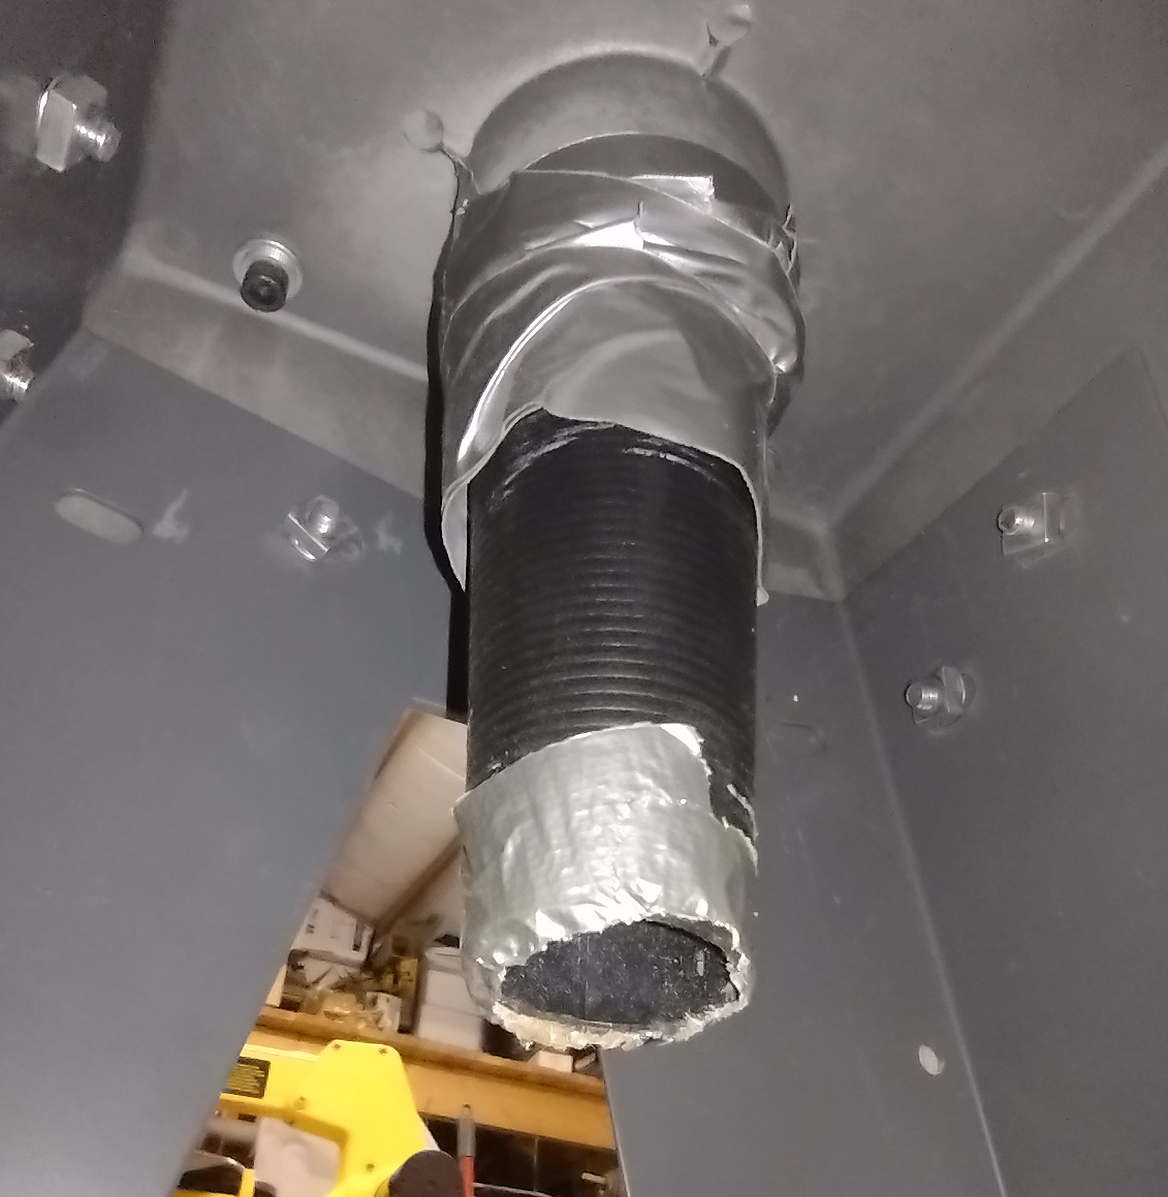
This is the only one of the three to show any concern about dust collection. Under the base (not the table), there is a round port to connect a shop vac up to. I have not used this, so cannot opine on its utility. My daughter has made her own adapter to fit her vacuum. In an earlier photo, you saw the top end of this fitting.
I do not believe you will find a new one of these saws to buy. The last paper catalog to list the Shopsmith accessory mounting was printed in 2018. The saw was listed then for $897.00. At that time, the power stand and standalone options were no longer offered. The 2022 paper catalog does not list any of them at all. Interestingly enough, the online catalog today still lists the accessory mounting, but shows it as currently unavailable with a price of still $897.00. It also shows the standalone scroll saw as unavailable, but with a list price of $9999.99! The 2007 catalog showed the accessory mounting as $649.00, and the standalone scroll saw as $849.00. So if the same price difference existed today, the standalone scroll saw would be around $1100.00! Perhaps they are planning to bring these back if they think the market will support them.
I do not think there is much else to say about the basic description of this saw. So, let’s move on!
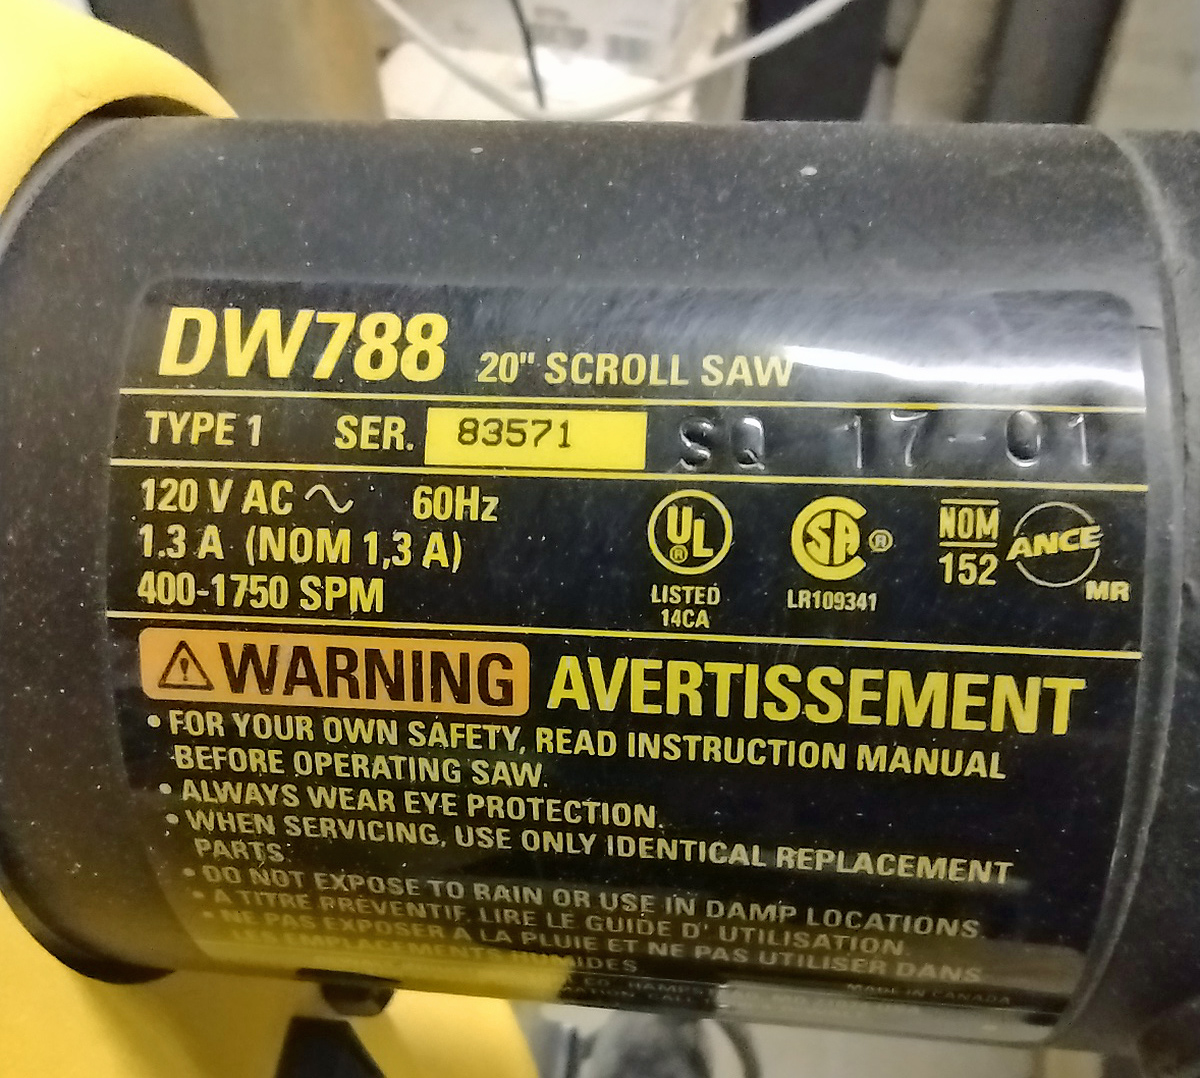
DeWalt DW788.
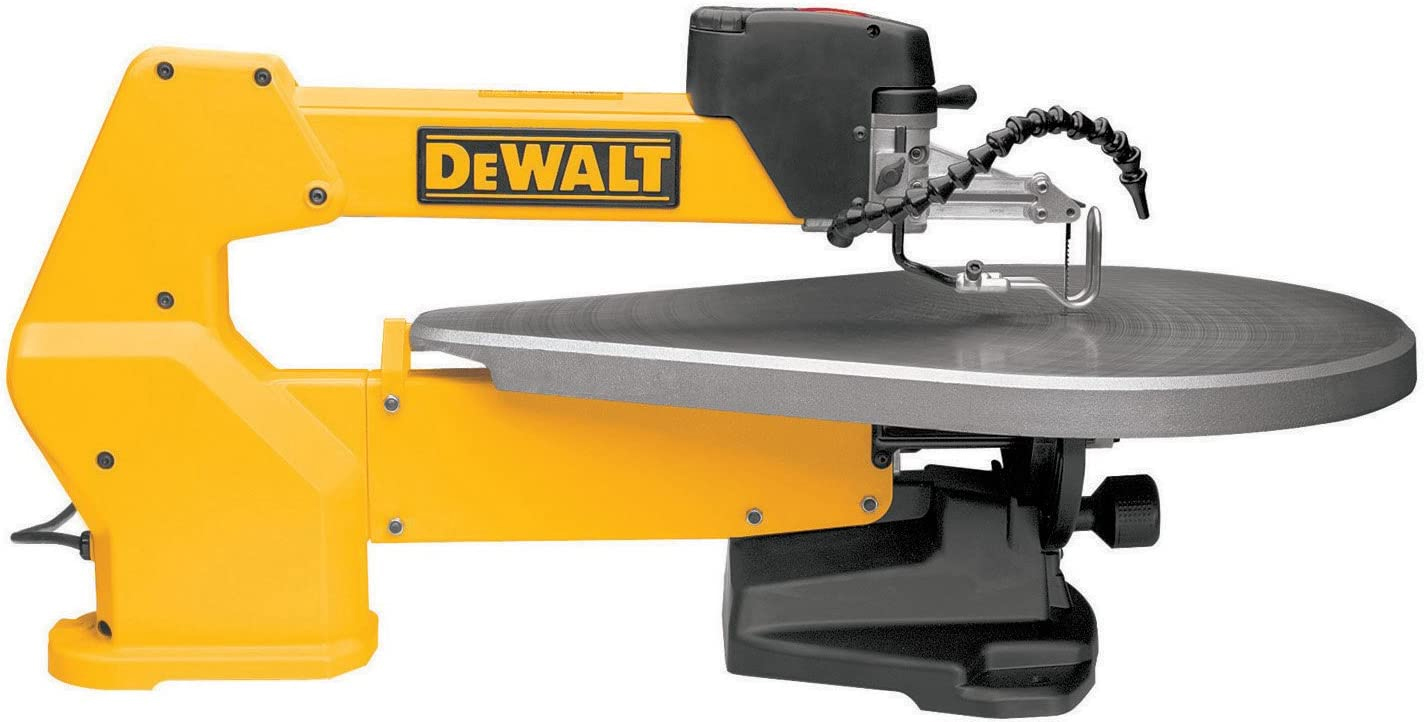
As mentioned above, this saw was purchased to stop putting wear and tear on my base Shopsmith. I found this used off of Craigslist for around $300. It included a stand and appeared to have very low usage. I was particularly happy to find it is a Type I, which means it was made in Canada at the same Sommerville Manufacturing factory where the original Excalibur II scroll saws were made. Type II saws are made in Taiwan. I have no personal experience with a Type II.
This saw uses the parallel link mechanism. This takes you to a .pdf document on a court case that has some interesting background information on the original Excalibur saws and their relation to the DeWalt (Black and Decker) saws. In there is a mention that the original parallel link mechanism was actually patented back in 1870. I had always assumed that Tom Sommerville came up with the design, but apparently not.
Tom Sommerville was asked to design a better scroll saw than a Hegner, and the Excalibur is what he came up with. The first one went to market in January 1983. In 1988 some refinements were made. This resulted in the purple Excalibur II, which is what I think most people are familiar with when talking about the original Excalibur scroll saw. In 1995, Black and Decker approached Sommerville about making them a scroll saw with the parallel link system but a number of significant differences from the Excalibur II. The first DeWalt scroll saws started shipping in May of 1997. In 2003, General Manufacturing bought out Sommerville Manufacturing. I have read that this is when the DeWalt manufacturing moved to Taiwan and became the Type II. I find it interesting that DeWalt was labeling the Type I from the beginning. They may have been planning to move production all along.
There are differences between the Type I and the Type II, but I am not aware of them all. I can remember there were a number of forum discussions talking about some of them. One had to do with the On/Off switch getting full of sawdust and shorting out. There was an issue with warped tables and some alignment issues. Most of these all had to do with starting new production lines in a new location and were long ago corrected. The repair parts places seem to sell the same parts for both of them.
This saw is mounted on a 4-legged stand. It is sturdy enough, but it does not have individual leg levelers like the other two saws do. Most DeWalt saws I have seen have a different stand with the back leg being one wide leg instead of two independent legs. Some of the DeWalt saws are sold without a stand and can be mounted onto a bench.
Once I had the saw home and started working with it, I noticed it had a real loud knock at high speeds. Searching on the internet, I found a solution for this that worked. “If the saw has a knocking sound, that is remedied by taking the top screw out of the tension lever, removing it, then remove screws from the sides of the black housing. Be sure to go slowly and not lose the small bushing when you remove the cap. There is a rod with an L shape end that goes to the rear, with the front of the short L sticking up into the housing. After removing the metal housing piece, turn the L end of the rod one turn clockwise, and reassemble. You will notice when you tension the blade again, the tension lever won’t travel as far to the right to achieve the required tension amount, and the knocking will mostly be gone.” I have had no issues with knocking since I made this adjustment. If that doesn’t work, Rick’s Scroll saw page has several other fixes to try.
This has a different blade clamp system from the Shopsmith and Hawk saws. The blade holders are not detachable and are part of the arm assembly. There is a slot that the blade fits in, and a thumbscrew that tightens to hold the blade.
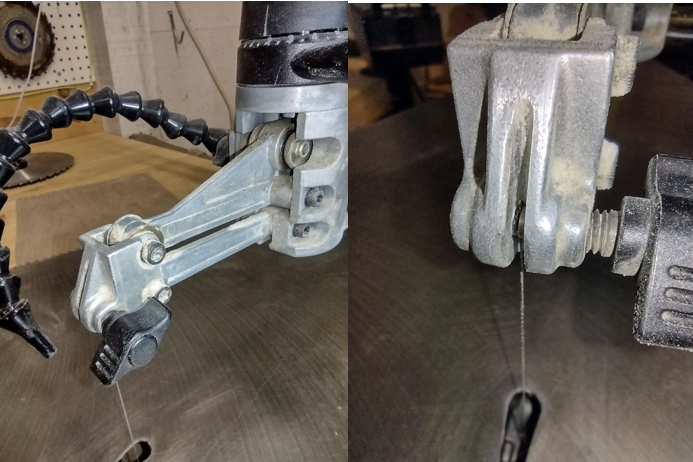
Unlike the Shopsmith and the Hawk, you can slide the blade up and down anywhere in the slot as long as the blade is totally engaged by both the upper and lower clamps. This will become an interesting point in the next blog post.
To install the blade, I pinch it between my left thumb and pointer finger. I insert the bottom through the slot in the table. Using my right hand below the table, I ensure the lower end of the blade goes in the lower clamp. Then I move my right hand up to the upper end of the blade, ensure it is in the slot and tighten the upper clamp. Then I reach below the table and tighten the lower clamp. Rotate the tension lever at the front of the upper assembly, and you are ready to cut! Push the “on” button with the same arm motion, and you are cutting. This is intuitively the fastest blade change system I am familiar with.
The table is made of cast iron, which I prefer. Cast iron will rust, so you need to keep it clean and polished with wax. The aluminum tables also need to be kept clean and waxed. Additionally, if you do not, the aluminum tables will create black marks on wood.
The table does not have an extended slot for the blade to lean forward for bottom feeding, but you can either top or bottom feed for fretwork projects. The upper arm on the DeWalt does lift up. The DeWalt upper arm contains the air blower hose and has an articulated end on it so you can adjust where the air comes from and blows toward. With the Shopsmith airline mounted on the hold down foot, air blows directly at the sawyer, which is aggravating.
The saw comes with a hold down foot, but this is the first thing I took off. I was surprised I could even find it just to take a picture!

The table tilts 45 degrees left and right.
New DeWalt scroll saws are available today. Prices are all over the place on the internet. Check what you are looking at to verify if the price you see includes a stand or not. These are often packaged with a stand, a light, and sometimes a foot switch.
That is about all there is to say about this saw! Moving on.
Hawk G426.
Last but far from least is my Hawk. Like many tool companies, this one has gone through name and ownership changes throughout the years. When I was a younger man, RB Industries (or RBI) was a well-known tool manufacturer. Besides scroll saws they made a number of other woodworking tools. They had four lines of scroll saws, but the “Hawk” line was the most popular. They even made a short-lived version that would mount on a Shopsmith! I found these pictures on a woodworking forum, and this is the only reference I have found to it.
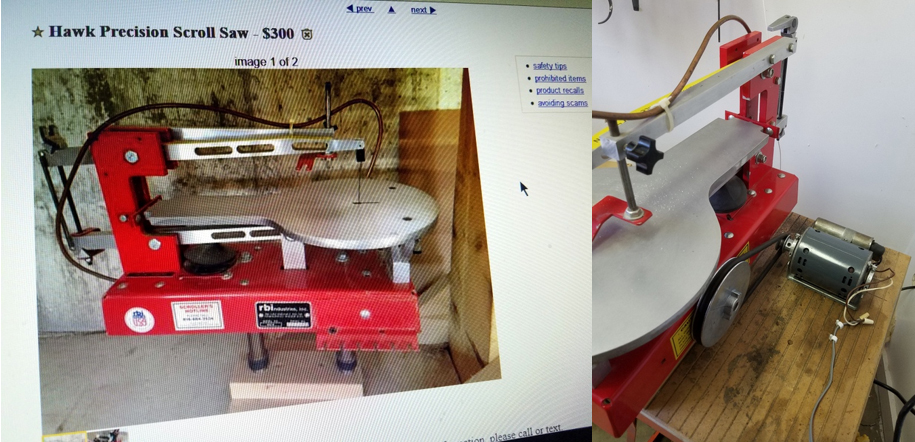
According to the original post, this was a Hawk model SS14. The 14 meant the depth of cut was 14″. The left side picture above was the listing he bought it from. You can clearly see the two vertical posts that would be used to mount it on the Shopsmith unit. In the right-side picture above, you can see he mounted a 5″ pulley where the Shopsmith plastic connector would normally go to connect to the Shopsmith motor. Oh, the rabbit trails you can go down!
Anyway, the company traces back to 1929. This next snippet of history is a paraphrase from the current company’s website. After a couple of generations of family run business with the family name, it was sold out of the family in 1972. The new owner incorporated as RB Industries in 1976. Upon that owner’s death in 2007, the business was sold to an investment company that changed the name to Hawk Wood Working Industries. This is the company whose name is on the saw I bought. This company closed the doors on the factory in 2009 and put it up for auction. The current owners, Bushton Manufacturing, purchased the company and resumed production 2 months afterwards.
This G4 saw had the latest and greatest improvements made by RBI. At that time, RBI had their “Ultra Precision Scroll Saw” in 20″ and 26″ throat capacity. The models were 220VS Ultra and 226VS Ultra. The VS stands for variable speed. Older RBI Hawks often had a stepped pulley with a belt to change speeds or were single speed. These would typically be something like a model 220-3, meaning 20″ throat and 3 speeds. And then they introduced the G4 with a bunch of improvements. This is a great video to watch about this saw and some of the stuff it does, especially for people just getting started with a scroll saw. Based on watching this other video from the Bushton Manufacturing folks, they incorporated all those G4 improvements into their new BM series Hawk scroll saw that are currently for sale.
I was really NOT looking for this saw. I had the Shopsmith scroll saw attachment and the DeWalt. I wanted a saw with a deeper throat depth for cutting larger puzzles. I was specifically looking for an Excalibur II EX30. These seem to be pretty darn rare where I live, as I have yet to find any in the local area. Lots of Hegner’s and Hawks, but not a single Sommerville made Excalibur have I found listed in 15 years. Even used on Craigslist, the Hegner’s and Hawks have premium prices on them. I eventually found this Hawk listed for an unbeatable price and moved on it a couple of years ago. 26″ is not 30″, but you play with the hand you are dealt. Prior to this comparison test, I have used it with a #9 blade to cut some flooring for “The Cave”, which is my in-house work shop. I have also used it to cut three large puzzles in half so I could better handle them on the DeWalt (which is what I really bought it for). Cut an entire puzzle with it? Nope.
Some of the unique things about this saw: 1- lower blade clamp is in front of the tilt mechanism, making it very easy to access, 2 – the lower blade clamp can be adjusted forwards or backwards to put an aggressive angle on the blade for cutting thick wood, 3 – the accessory arm has a hole for mounting magnifying lights and it can be moved to either side of the upper cutting arm, and 4 – it can be equipped with diamond blades and an optional drip tank for cutting glass and ceramic tile. There are other items as well, but these are the ones that jumped out at me after using the Shopsmith and the DeWalt.
So, to continue with the same general discussion pattern on the actual saw, let’s look at the blade holders. These are an upgraded blade holder. Pictured below is the bottom blade holder. It has a spring clip it comes out of fairly easily. It has a thumbscrew to tighten it, so no special tools required. The “gripping” end of the thumbscrew is nice and flat, instead of the tapered end the Shopsmith uses.
In the rightmost picture above, the yellow hoop is the blade tension release. This is pulled forward to release the tension for a blade change, and then pushed backward once the new blade is in place. For some reason, I initially struggled with this set of blade holders and tension system. In fact, I kind of was avoiding using this saw until I decided to do this puzzle comparison cut. As the puzzle progressed, I became much more comfortable with it and will use this saw more often.
The tension is set from the back of the saw. Referencing the three pictures below, the left photo shows the vertical tension rod and the cam lever lock. To adjust the tension, lift the lever lock, let go, and twist the tension rod. Twist the tension rod until the lever lock is at the correct clock position for the blade size you are using per the chart mounted on the saw. For a 2/0 blade, the lever lock should be at the 12:30 position. Then, press the lever lock back down as in the first picture. From that point, as long as you keep using the same blade size, you should be able to just use the tension release lever up front for blade changes. If you find you are breaking blades, come to the back and check your tension setting again.
The upper arm can be lifted, and you can do fretwork with either bottom or top feeding. It has an aluminum table with an elongated slot to lean the blade forward for bottom feeding.
The motor controls are on the side of the saw. I will have to include a picture of them another time, as I seem to have forgotten to get one and I am not going back to the shop just for that. The on/off switch clicks up and down like a light switch (instead of sliding up and down like the Shopsmith or rocking like the DeWalt). The switch actually will pull out of the housing as a child lock. The speed control is a rotary dial.
The saw came with a hold down foot like the rest, but I removed it. The saw has a nice articulated airline that is longer than the DeWalt’s. I was on the manufacturers website yesterday and discovered they have an upgraded airline that is a larger diameter to get more airflow to blow sawdust away. Perfect! I ordered that, and once it is installed, I will put this one on my daughter’s Shopsmith saw before I return it to her.
The table tilts both left and right by 45 degrees, but to get the right tilt, you have to take a couple of seconds and switch the orientation of the lower blade clamp to put the thumbscrew to the left. Left and right 45 degrees did not really seem like a big deal to me, until one of the Hawk videos above pointed out that some brands of scroll saw have the motor mounted right under the table and physically cannot tilt the table to the side with the motor. Duh! The obvious saw that comes to mind for this is Hegner.
New Hawk saws are available to purchase today from Bushton Manufacturing. They have a number of optional accessories for their saws, including leg extension kits to raise the saw, table leg kits so you can fit a chair between the front legs, drip tanks for cutting glass and ceramic tiles, and other good stuff. They are NOT inexpensive. That is why I bought used. The nice part about used Hawk saws is that the company still supports the old ones, including having all the owner’s manuals available for downloading. Not everything is available, but many things are. Reading the owner’s manual for mine, I found they used to offer an optional caster set for this saw. You would lift a handle on the front to raise the front of the saw, and it would rock back onto two casters to easily move this around the shop. During my call yesterday, I asked for this kit, but alas, the last one finally sold and there was such little demand for it they are not making more. But, critical parts to repair your old saw, you bet!!
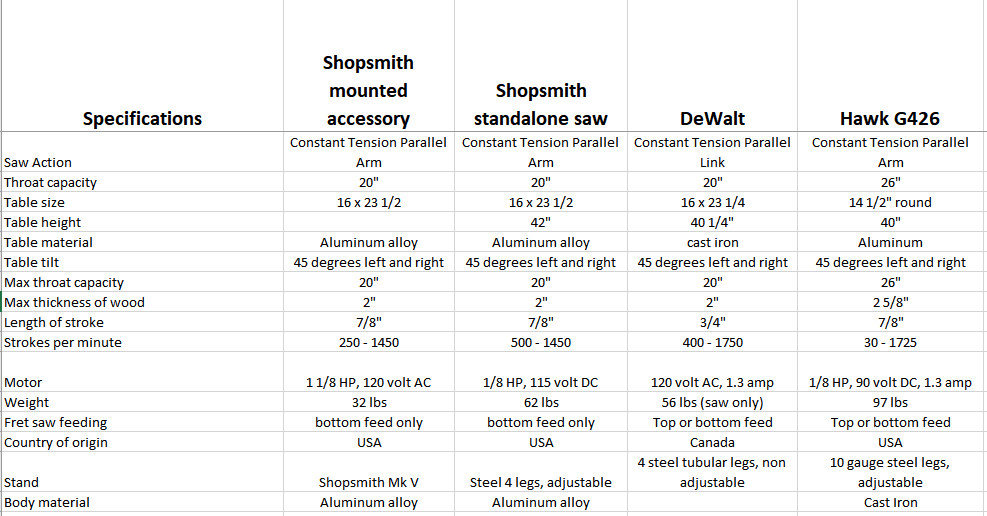
Here is a handy chart showing the differences between the saws. The Shopsmith accessory is included for reference. I see I did not get the body material on the DeWalt, but I suspect it is some aluminum alloy. I’ll have to hit it with a magnet next time I am in the shop.
The next entry will be part three. This will cover my observations as I cut puzzles with these three saws. I learned a few things, one of somewhat significant impact to me.
Hopefully, that blog entry will not take as long as this one. I ended up doing a lot more research than I intended to, and it has been eight days since the first post.
Happy Puzzling!
Bob